Revision: 5086c7bd99
Edited Create Indent completed
@@ -1 +1,154 @@
-No Content
+Following roles only had an access to create indent in desk
+
+1. Admin
+2. BM
+3. Traffic
+
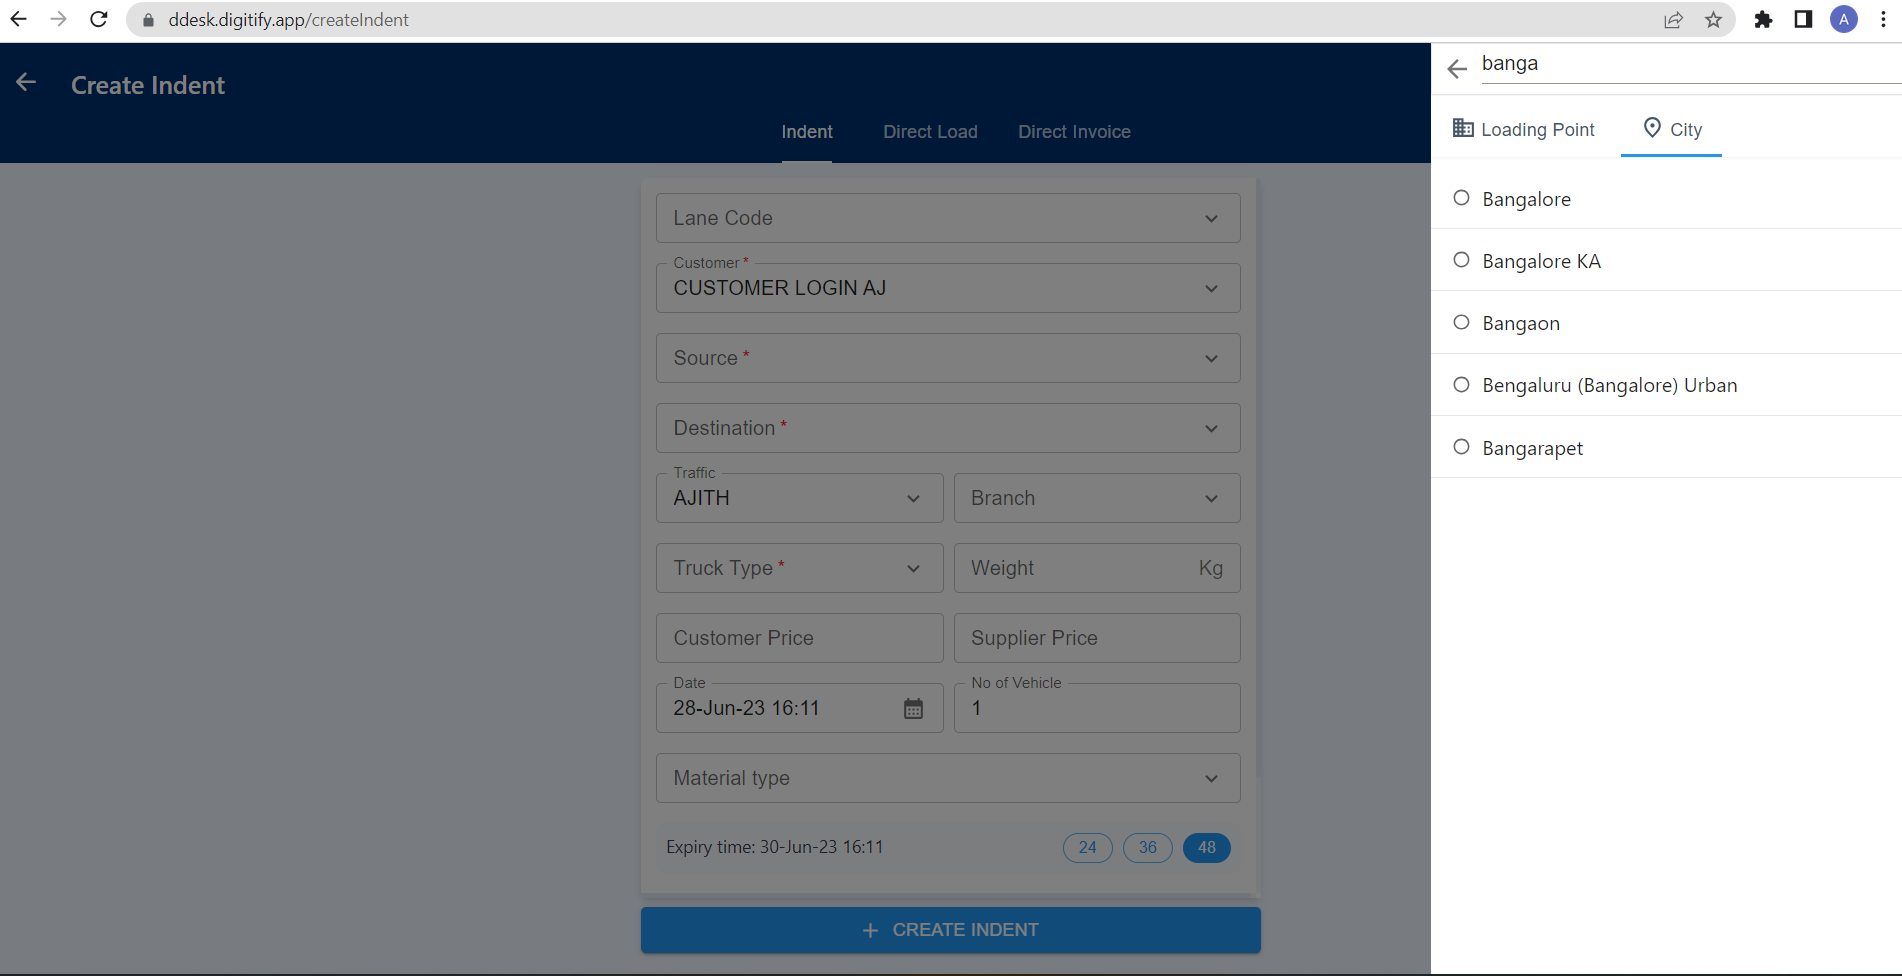
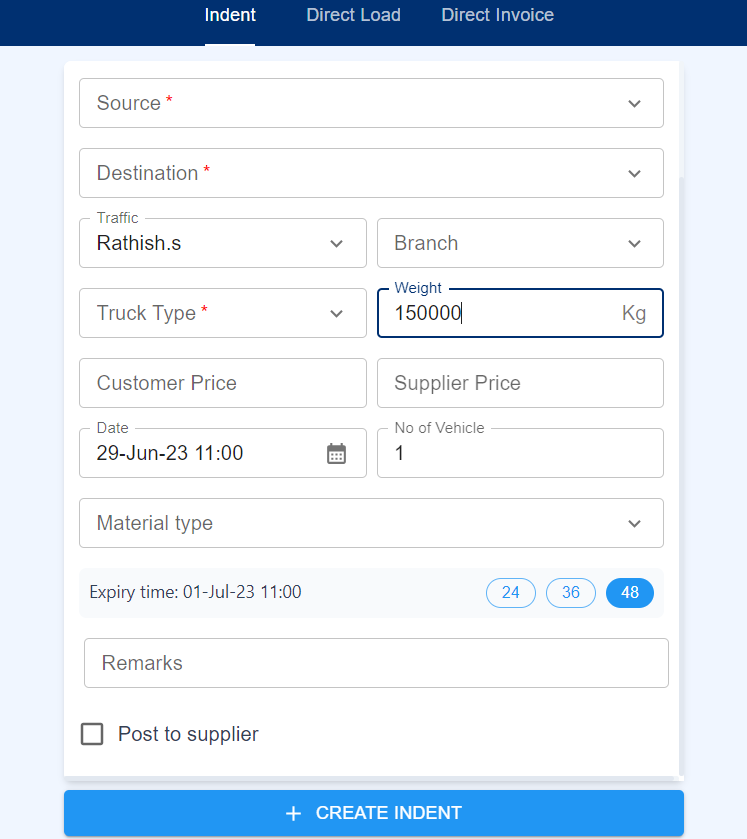
+To create an indent, the user can select the "Indent" button near the Dashboard tab. This will open a page where the user can enter all the required data, such as the source name, destination name, traffic employee, truck type, and more.
+
+The create indent page consists of three tabs: Indent, Direct Load, and Direct Invoice. The first tab, named "Indent," is where the user can create the indent. It's important to note that the user will only be allowed to create the indent once all mandatory data has been updated. The specific mandatory data may vary based on the user needs.
+
+By ensuring that all mandatory data is provided, the system ensures that the necessary information is complete before proceeding with the creation of the indent.
+
+
+
+**Lane Code**
+
+While click on this field, Lane codes will display on right, based on configured in organization > Lane tab. The admin has the access to create Lane codes. First user need to create Customer Lanes as existing. After created move to Organization tab and navigate to Lane tab. In the Lane tab, all the created Lanes will be listed, and categorized by customer names. Users can add a code name in the "Code" column, allowing for any applicable data type. User can add by clicking edit button in Code column. After updated user can able to create Indents by selecting lane code. Admin and BM role employees only Had access to Editing Lane Code in Organization tab.
+
+
+
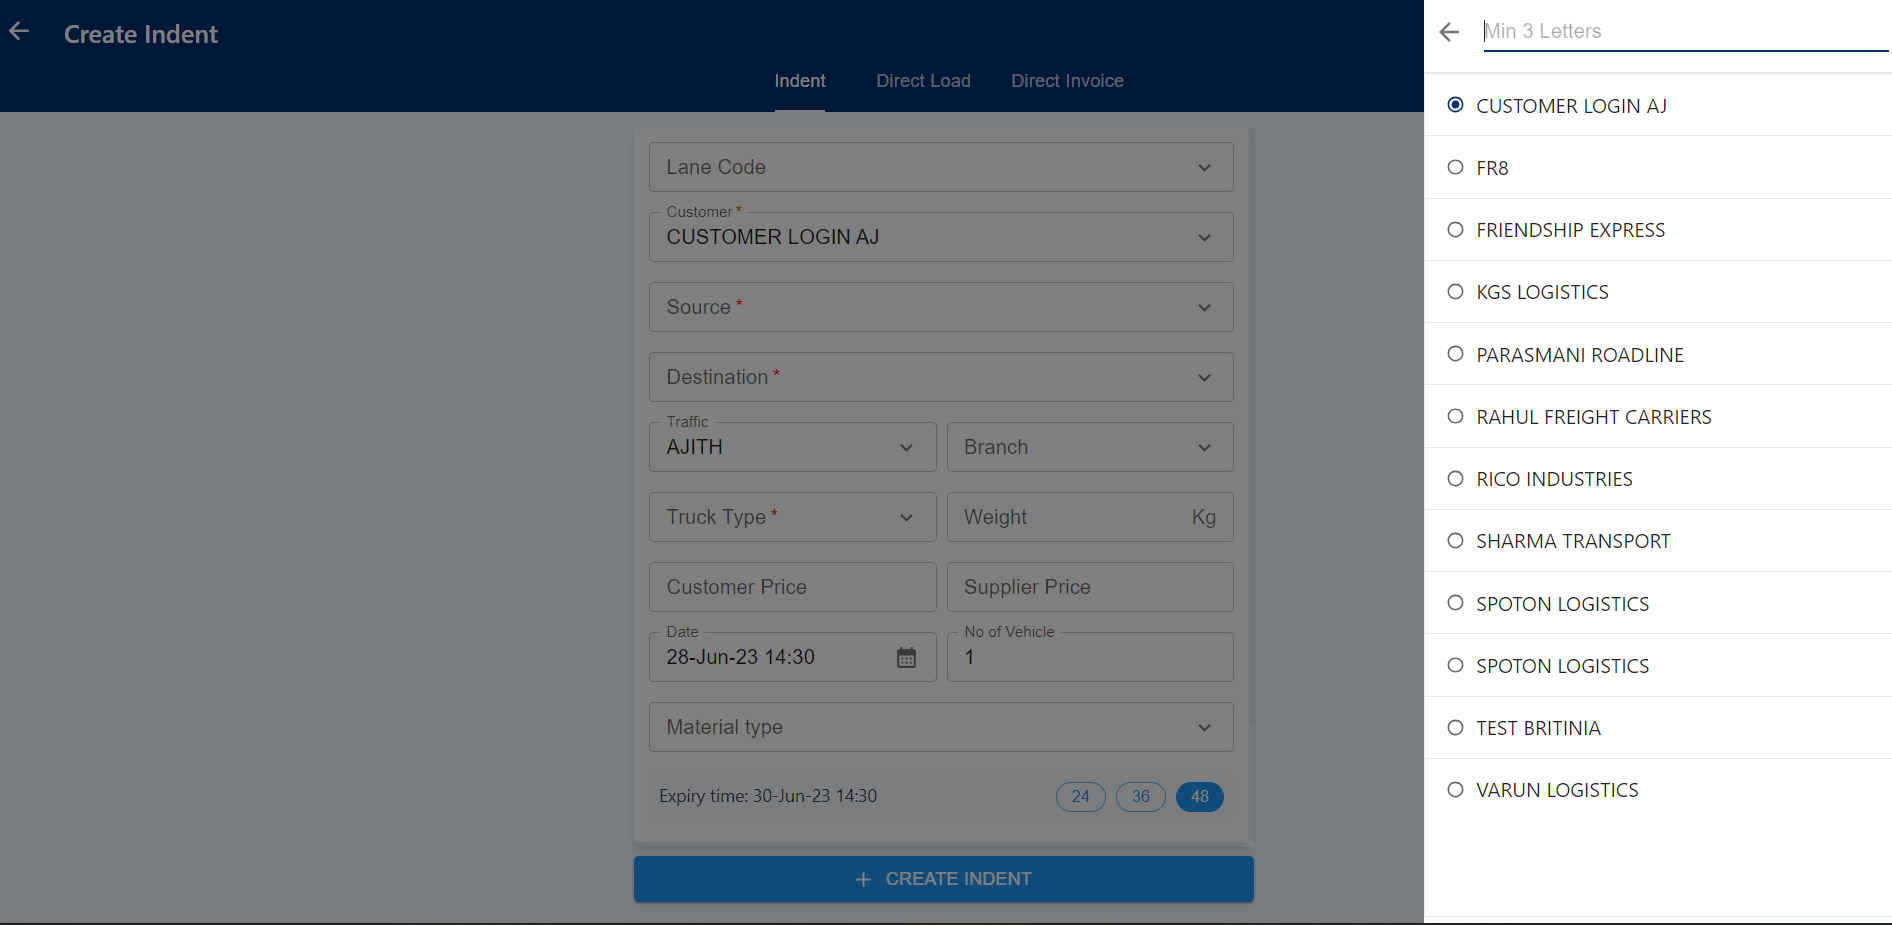
+**Customer Name**
+
+This field displays all Customer names in company. While click on the Customer field It displays all customer names on right, and also user can able to select customers by searching their names in search field on top of the customer names.
+
+
+
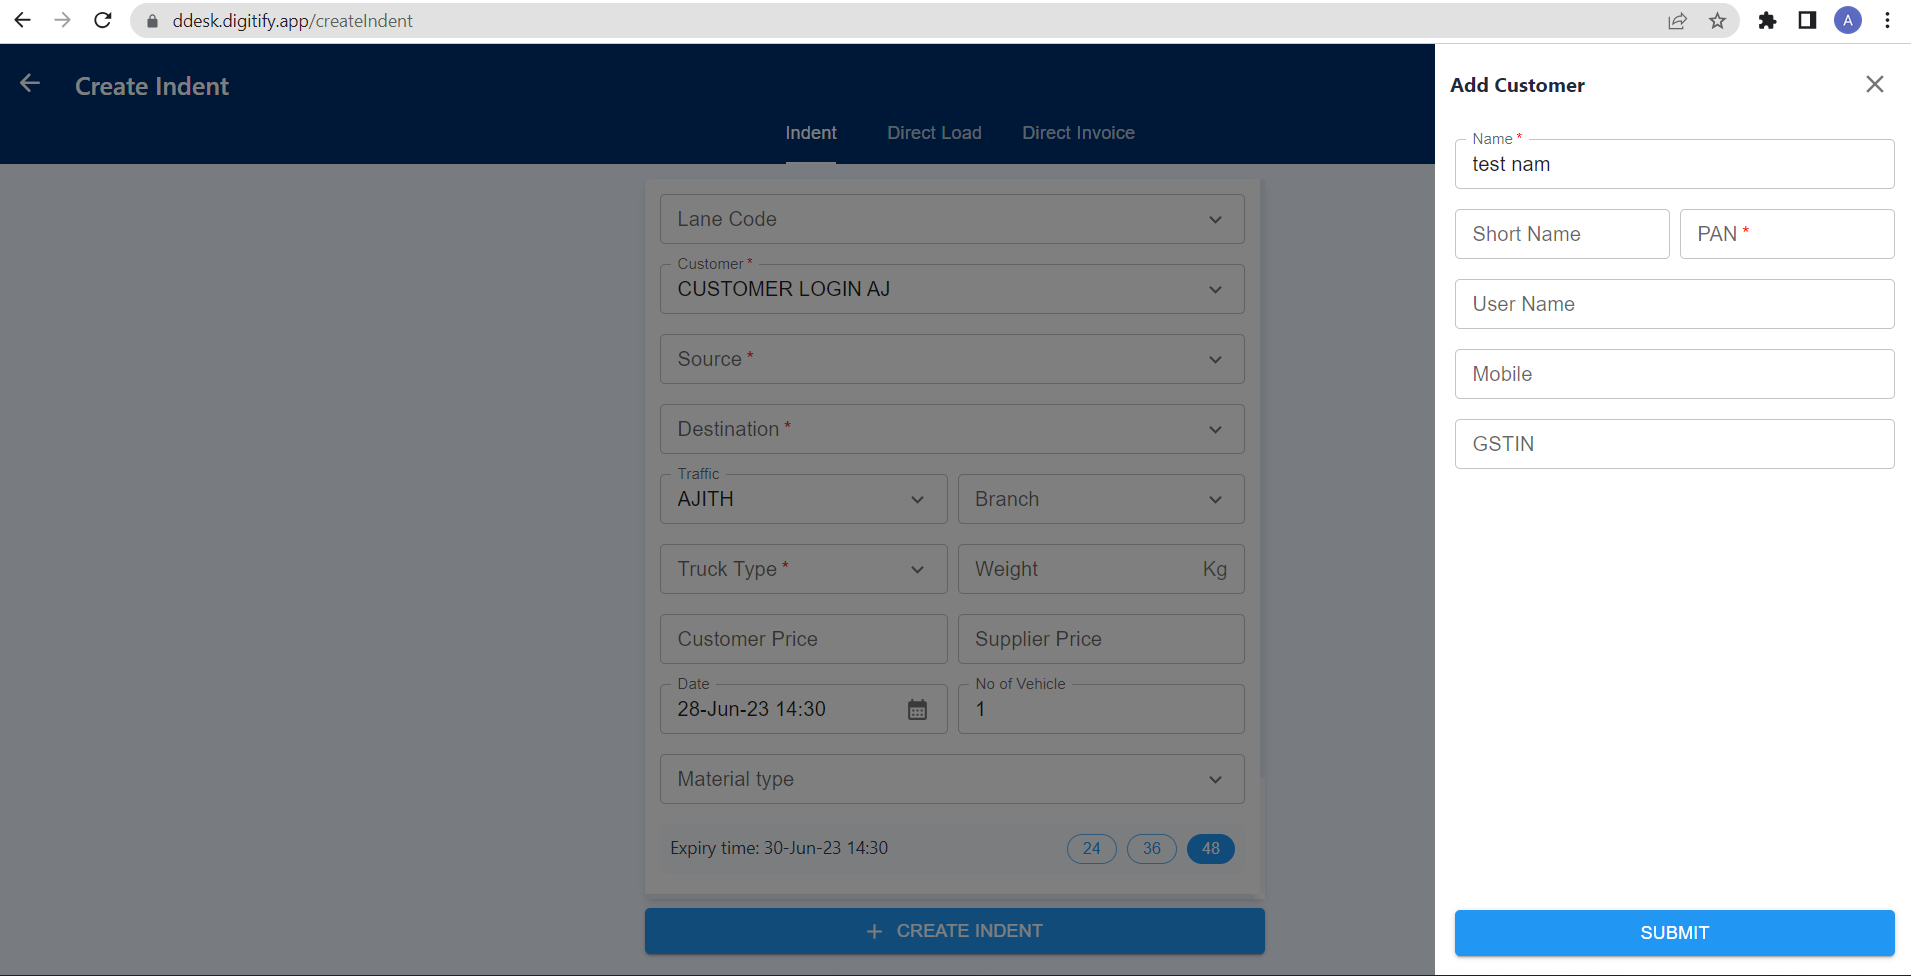
+When searching for a customer name in the search field, if the name does not exist, an Add button will be displayed exclusively for users with the admin and BM roles. They can click on the Add button to access the add customer page. In the add customer page, they can update all the required data such as Customer Name, Customer Short Name, PAN No, Customer Mobile, and GSTIN. This allows the admin to create a new customer entry with their relevant information.
+
+
+
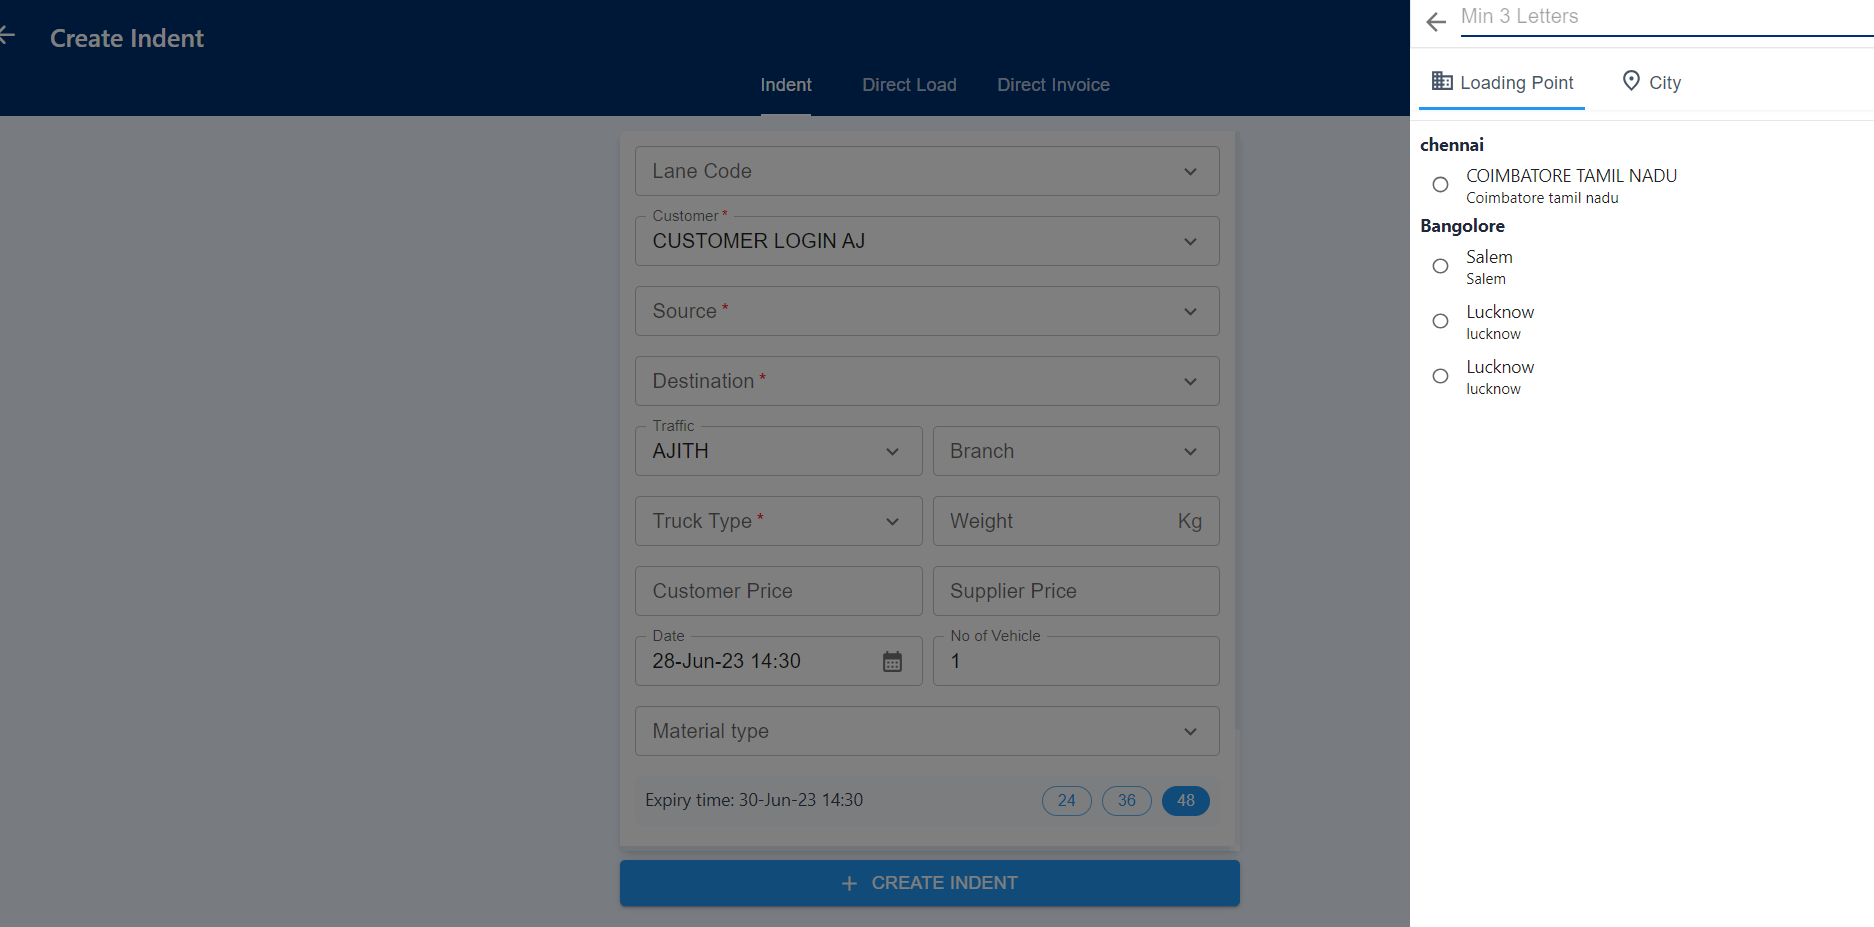
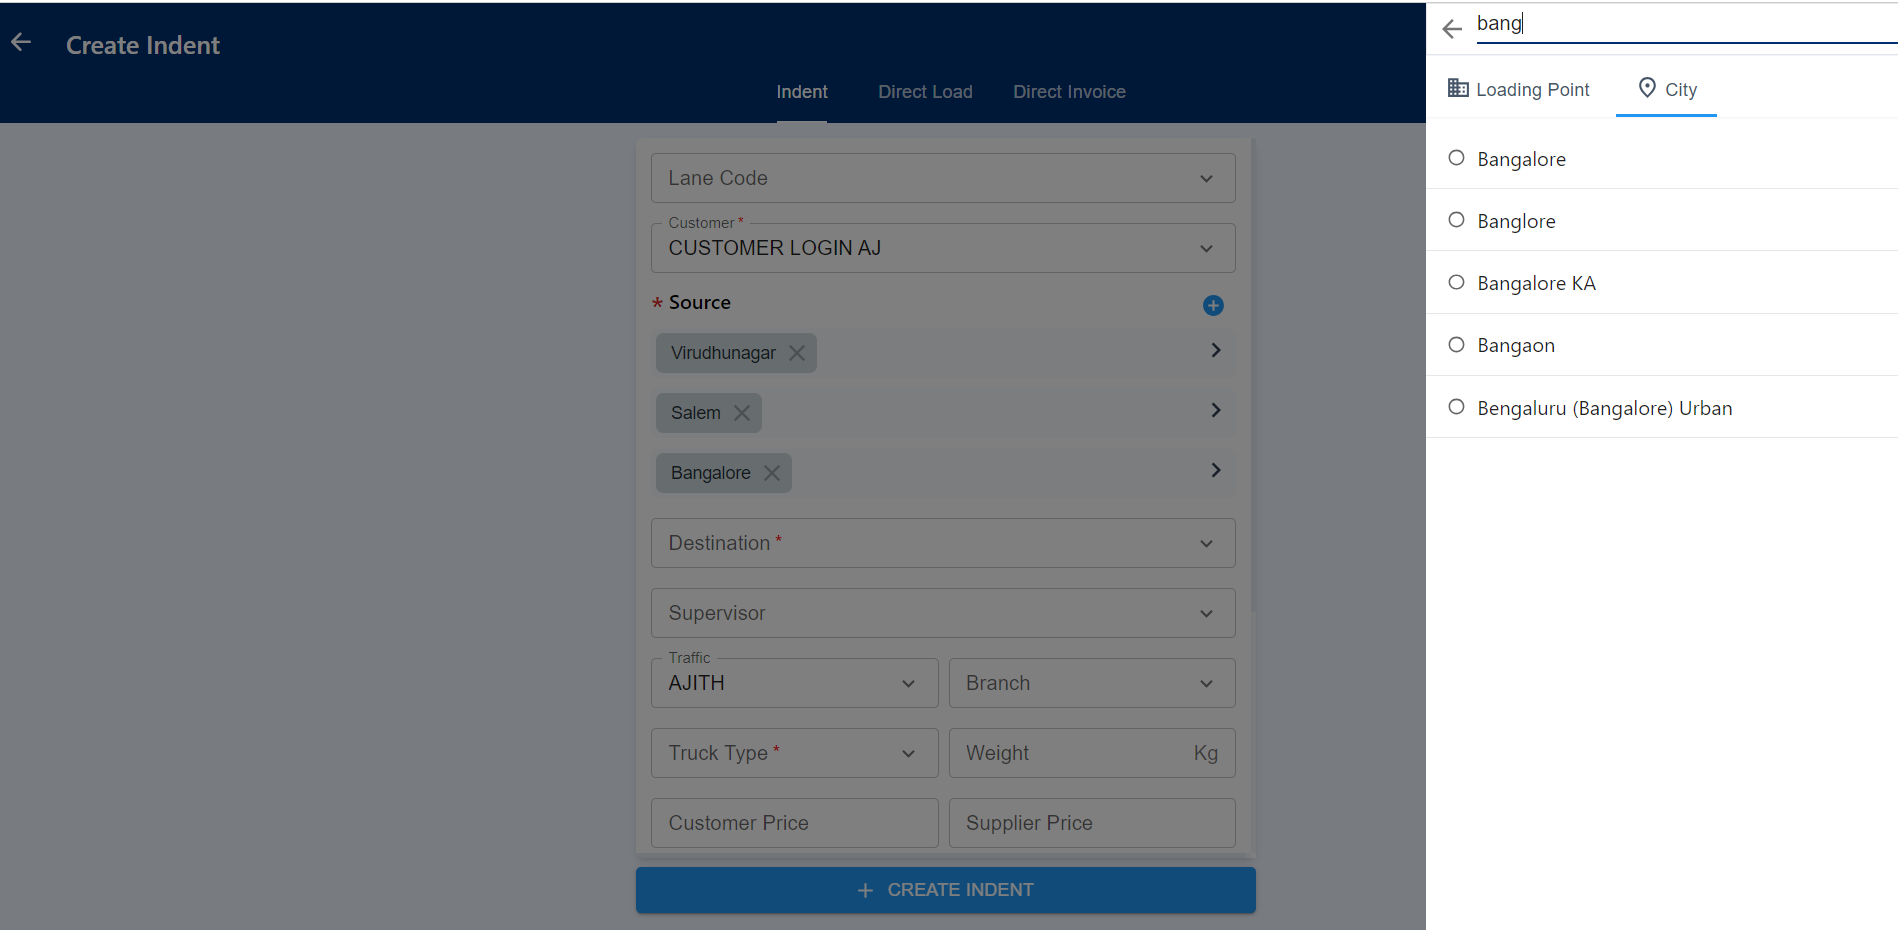
+**Source Name**
+
+While clicking the Source field, two sections are displayed: Loading Points and City. The Loading Points section shows the names of loading points categorized under their respective branch names. The list of loading points is based on the Lanes created in the customer detail page. Users also have the option to search for specific loading points by entering their names in the search field. In the Cities section, all city names are displayed, and users can search for specific cities using the search field as well.
+
+
+
+When searching for loading point names, if a match is not found, the system automatically switches to the City section and displays city names based on the user's search. The configuration of displaying loading point names under their respective branch names can be done in the Organization tab by the admin.
+
+
+
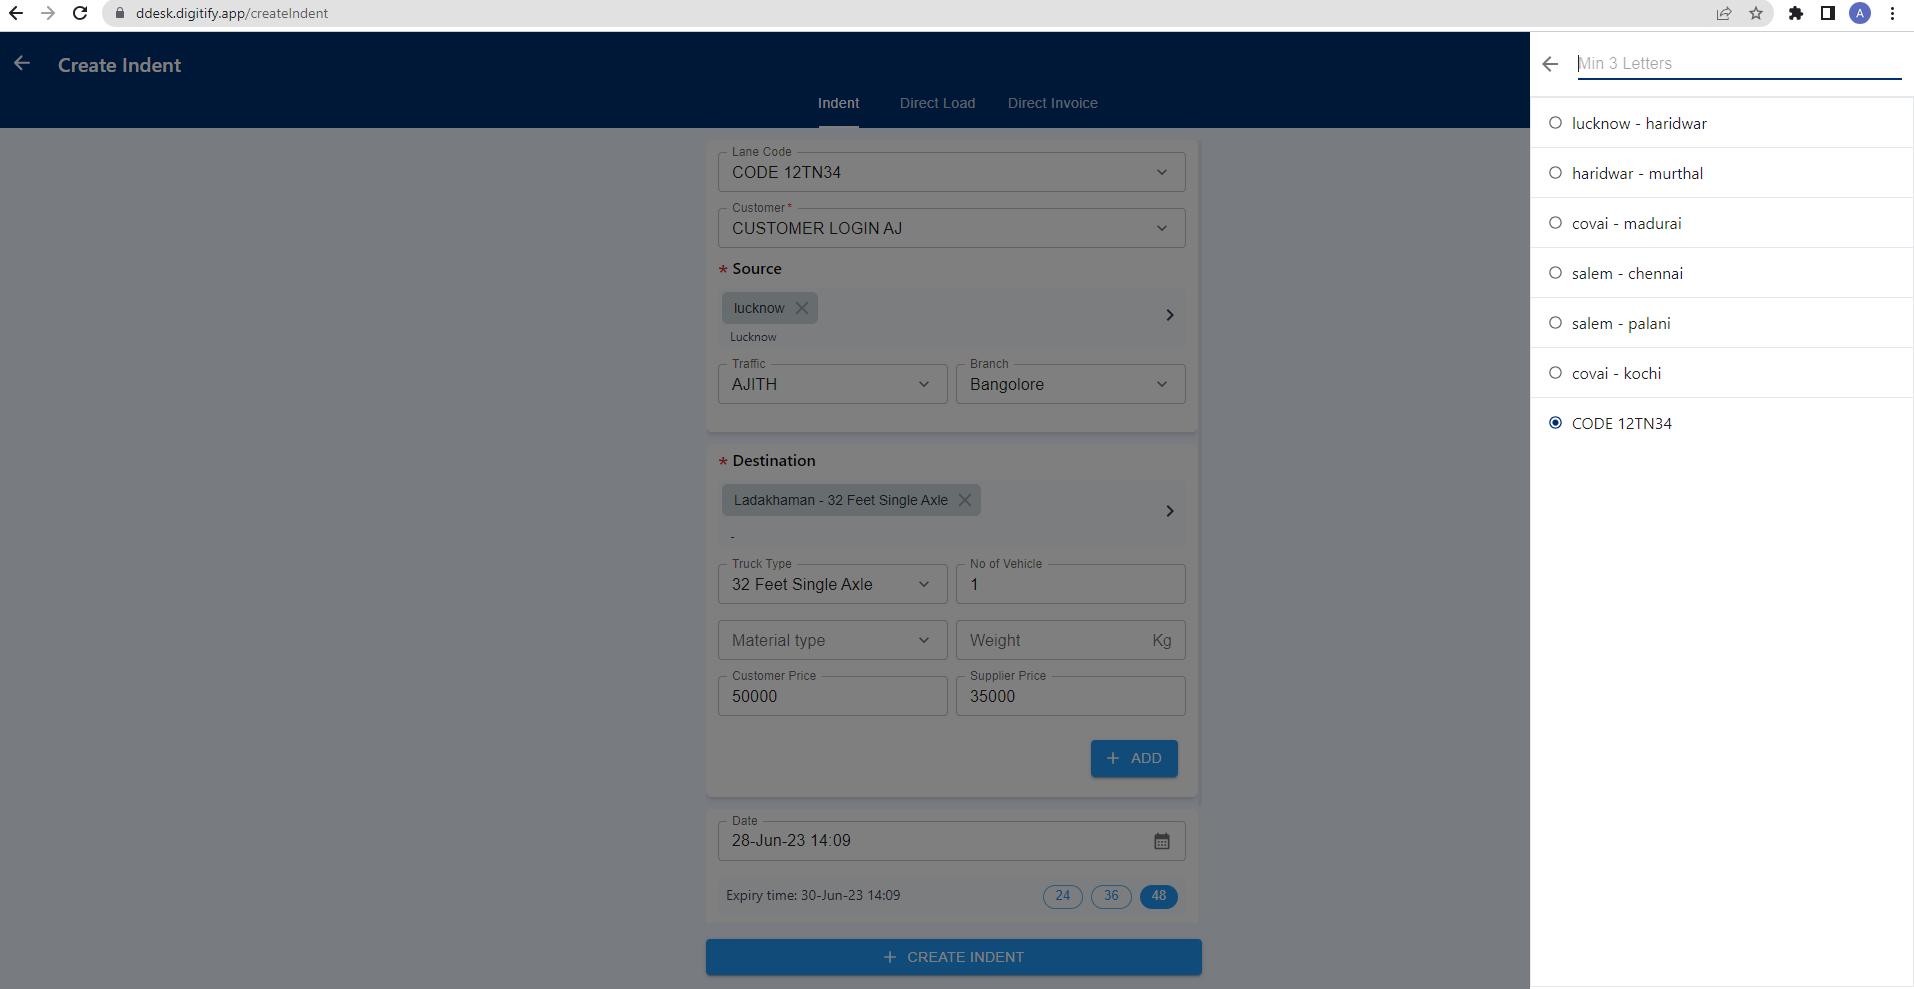
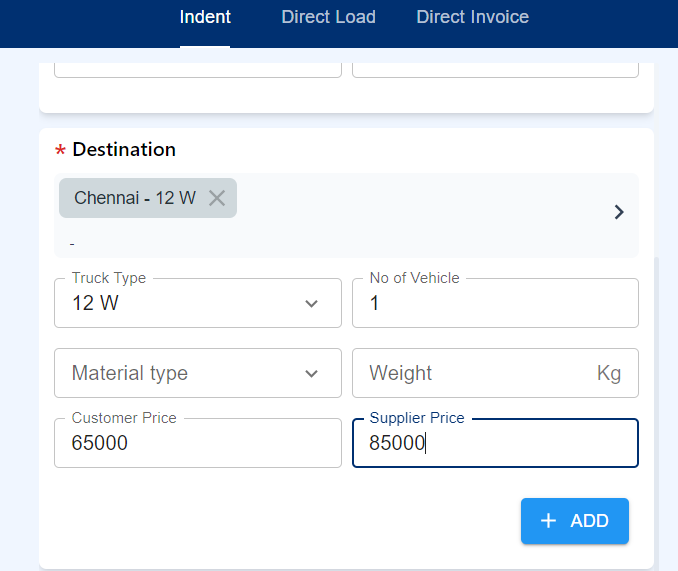
+**Destination Name**
+
+The Destination field functions similarly to the Source field by displaying Unloading points based on the configuration set in the customer lane under the corresponding loading point. Clicking on the Destination field presents a list of Unloading points, accompanied by their associated truck type names. Users have the flexibility to select their desired destination points using the search field located at the top of the Unloading points list.
+
+Users are granted the capability to edit or modify the selected loading and unloading points by clicking on the cancel symbol next to their respective names. It is important to note that if the Source is an adhoc city, the destination should also be an adhoc city. If the user has selected the Source from the customer lane, they are not allowed to create an unloading point as adhoc. In summary, the Destination field operates similarly to the Source field, displaying a list of Unloading points with truck type names. Users can select destinations, search for specific points, and modify their choices if necessary. Adhoc city restrictions apply based on the Source selection.
+
+
+
+**Creating Multi Loading and Multi Unloading points**
+
+User can able to create multi loading and multi unloading points in two way
+
+1. Configure in Customer Lane (Multi Unloading Points)
+2. In Adhoc Indents
+
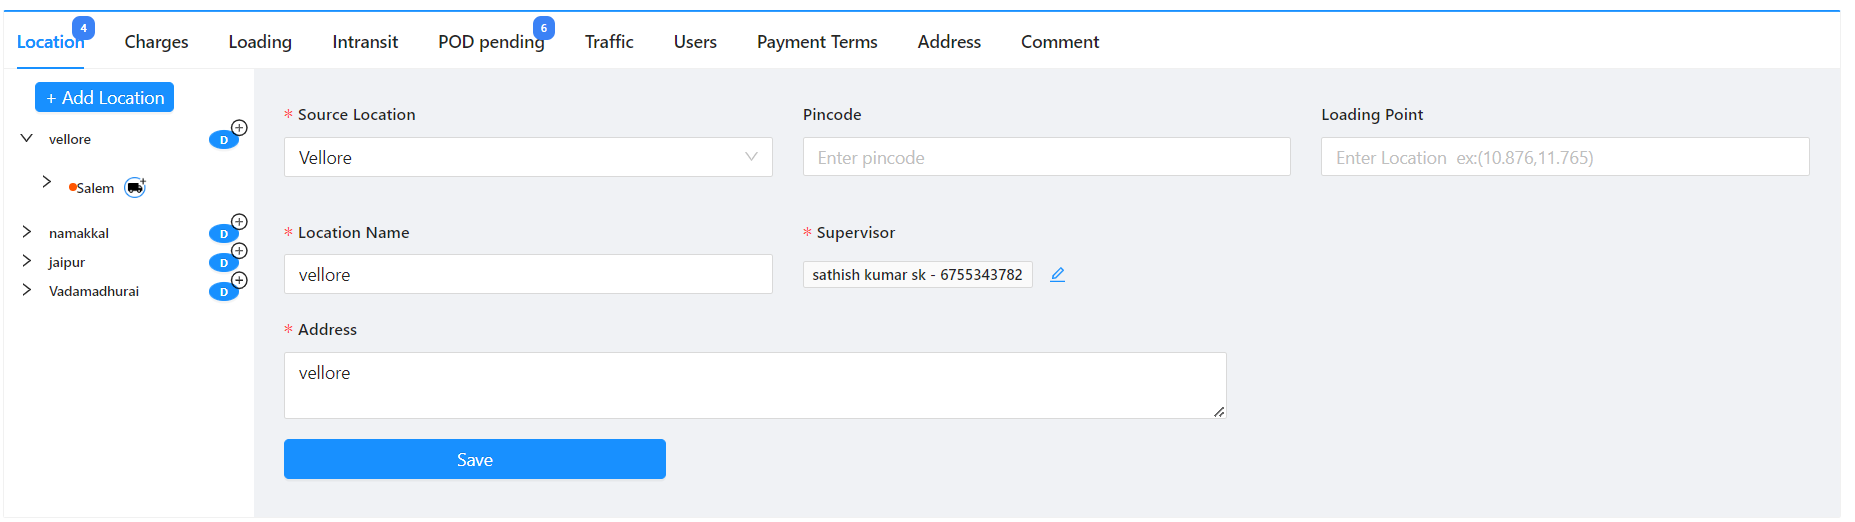
+**Configure in Customer Lane (Multi Unloading Points)**
+
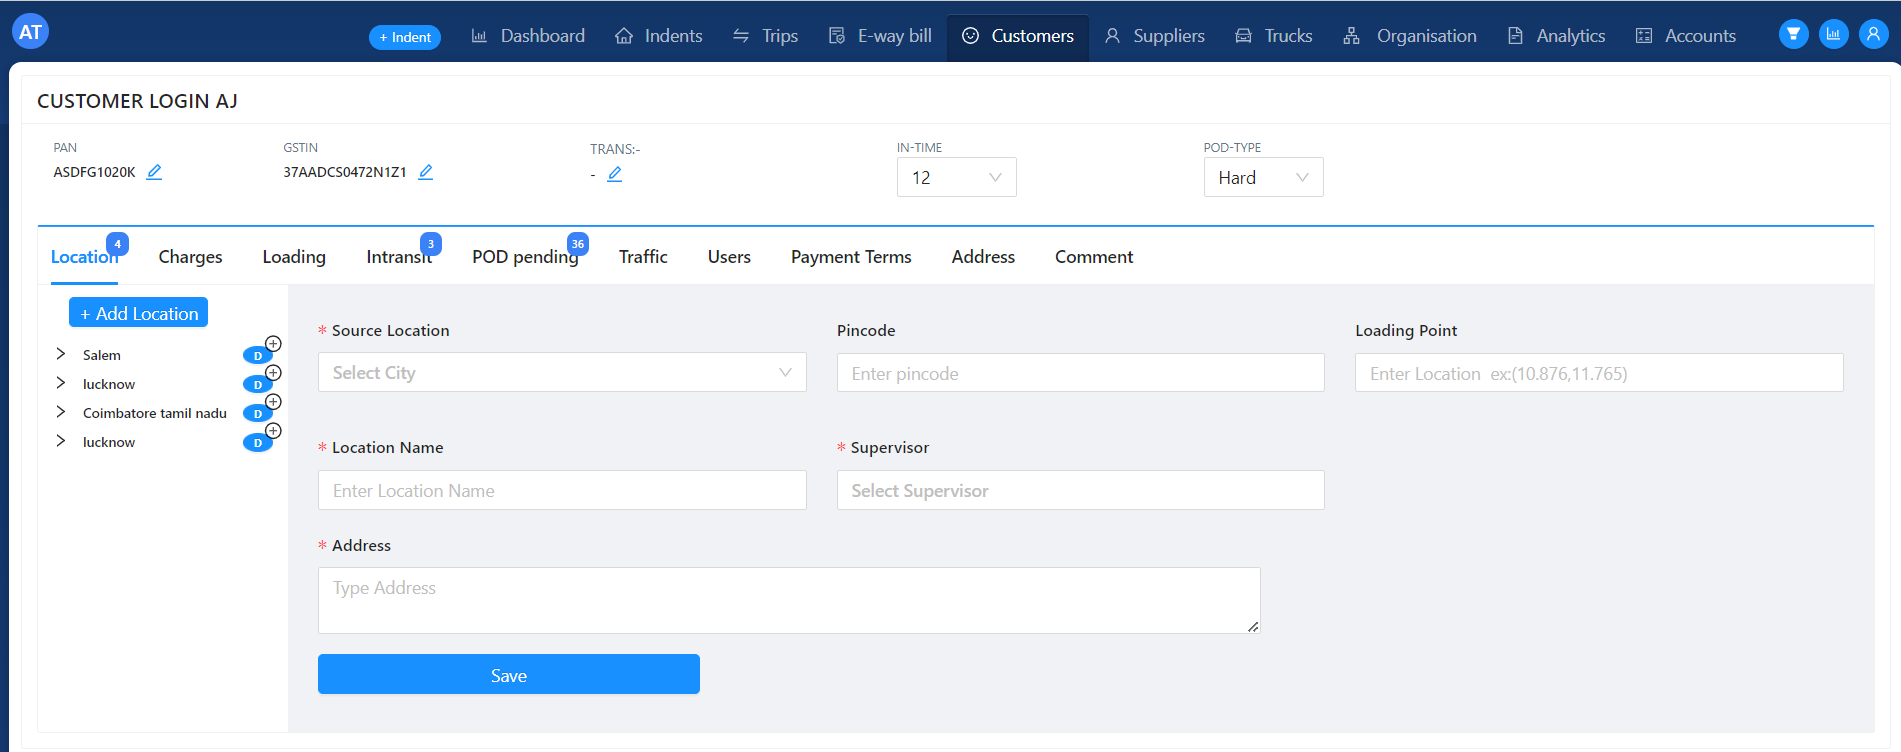
+ In the customer detail page, after creating a lane, users have the ability to add multiple unloading points by clicking on the destination name and selecting Add row.Upon clicking the destination name, the system displays details related to the destination, including the city name, distance in kilometers (KM), estimated trip days, address, and location. Below these details, there is an Add Row button. By clicking this button, users can add multiple destination rows, allowing them to include multiple unloading points for the selected lane.
+
+
+
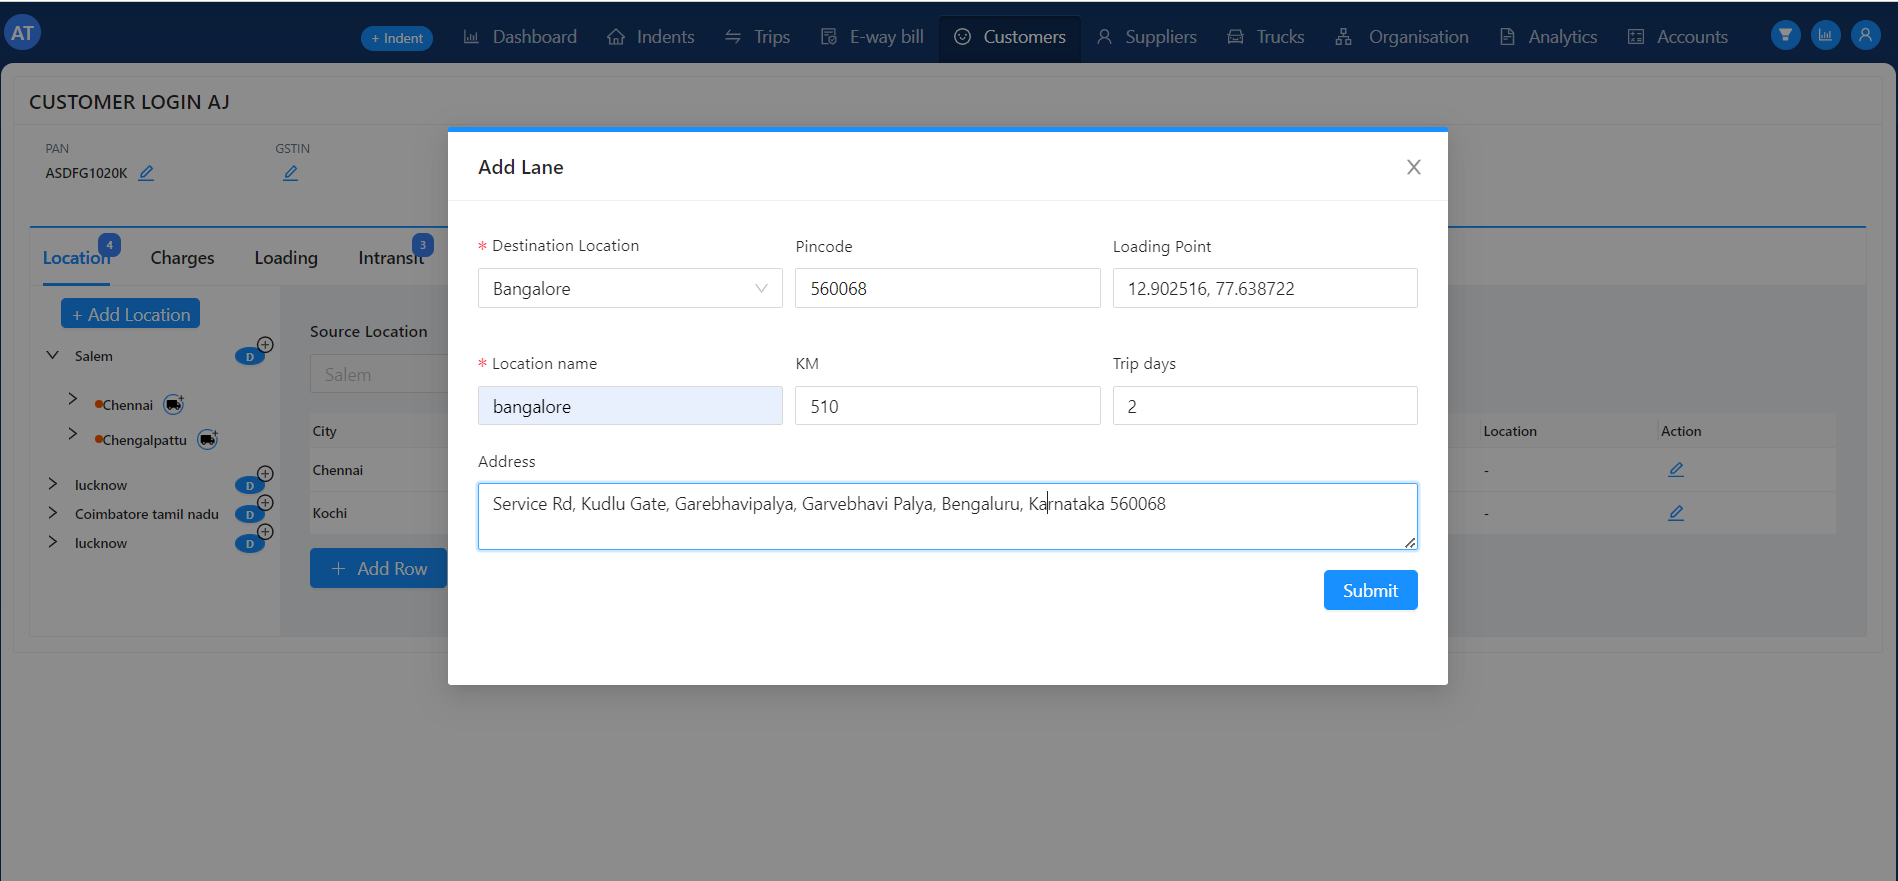
+After clicking the Add Row button, the Add Lane module will appear, providing users with the ability to update the unloading point location. In the "Destination Location" field, users can input the specific location of the unloading point. The "Location name" field allows users to assign a display name for the unloading point. The PIN code of the unloading point can be entered in the "Pincode" field. For precise location coordination, users can input the latitude and longitude values in the "Location point" field (e.g., 10.876, 11.765). The distance in kilometers (KM) and the estimated trip duration in days can be updated in the "KM" and "Trip day" fields and address of the unloading point can be entered in the "Unloading point Address" field.
+
+Once all the necessary data is updated, users can click the "Submit" button. Upon clicking, the entered data in the "Add Lane" module will be created as a lane destination, effectively adding the new unloading point to the lane.
+
+
+
+**As Adhoc Indents**
+
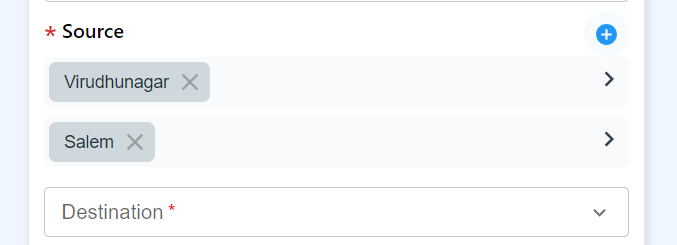
+Indents that are not created from customer lanes are referred to as Adhoc Indents. These adhoc lanes can be created by searching for city names in both the Source and Destination columns. After selecting the first city name, a "Pulse" button will appear at the top of the source name field. Clicking on the "Pulse" button enables users to search for city names in the city section. Upon entering a valid city name, a list of suggested city names will be displayed, allowing users to select the correct city for their loading or unloading location. In this manner, users can select multiple loading and unloading points based on their specific requirements.
+
+
+
+
+
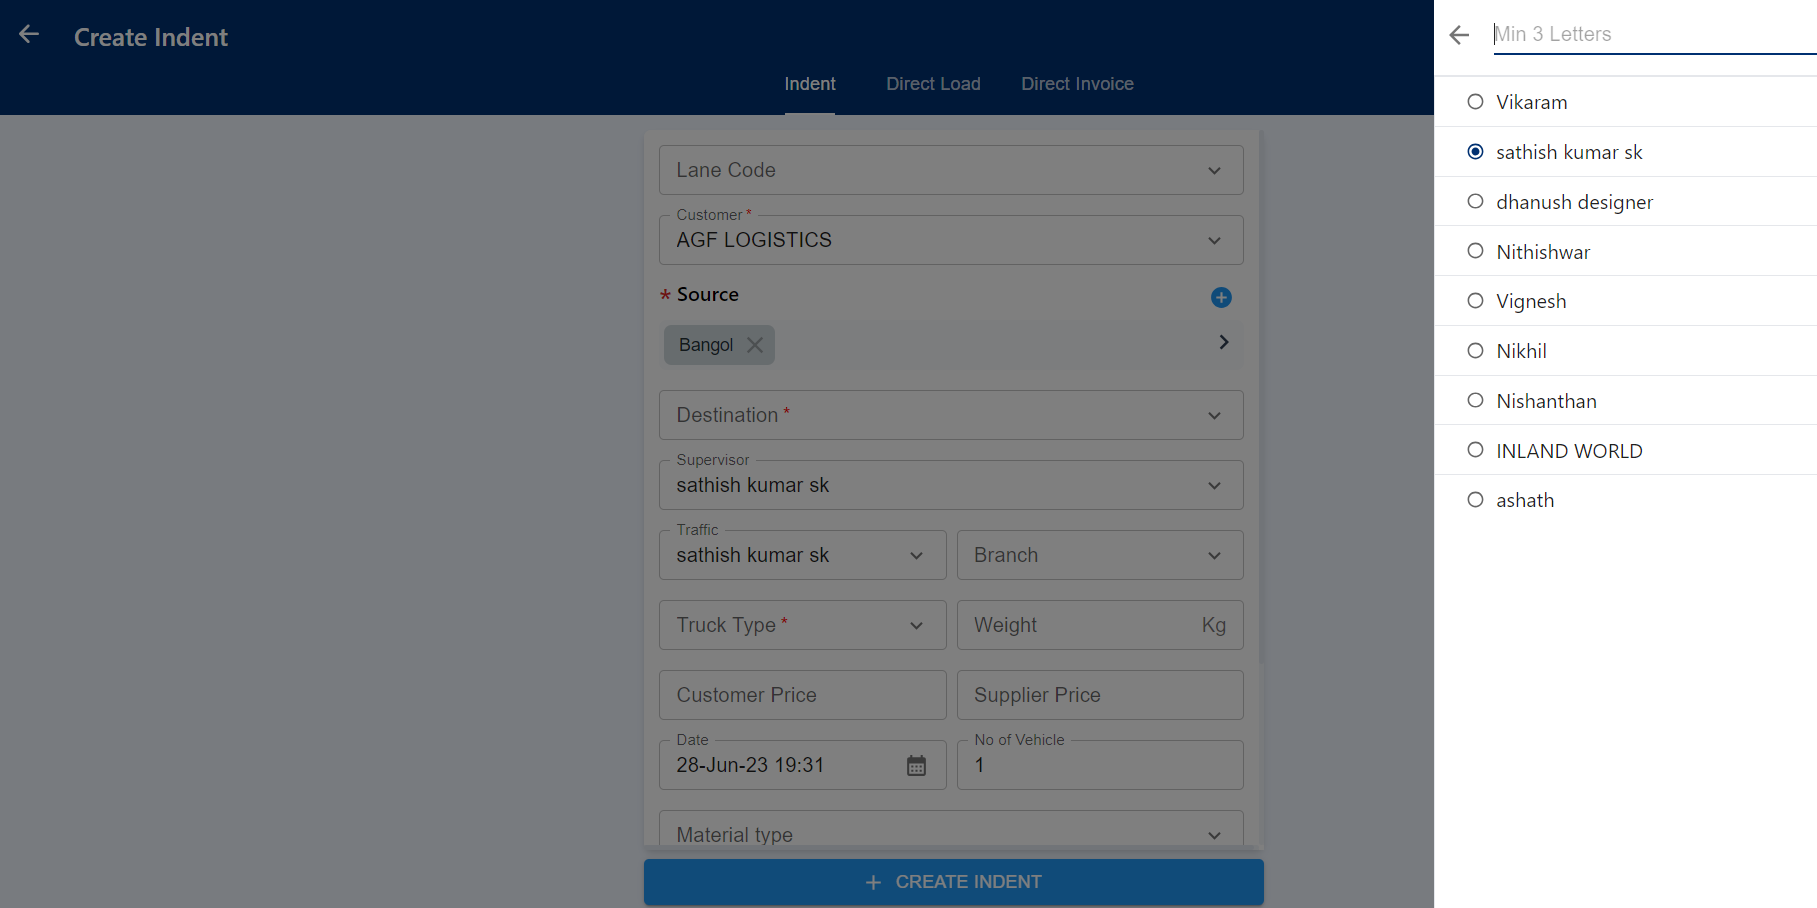
+**Supervisor**
+
+While click on this field, displays Supervisor role employee list. Where user can allocate selected supervisor role employee to maintain and monitor ongoing trips. If indent had created from lane Supervisor will configure in customer lane itself. If created as Adhoc user can select any of the name from displaying list.
+
+
+
+
+
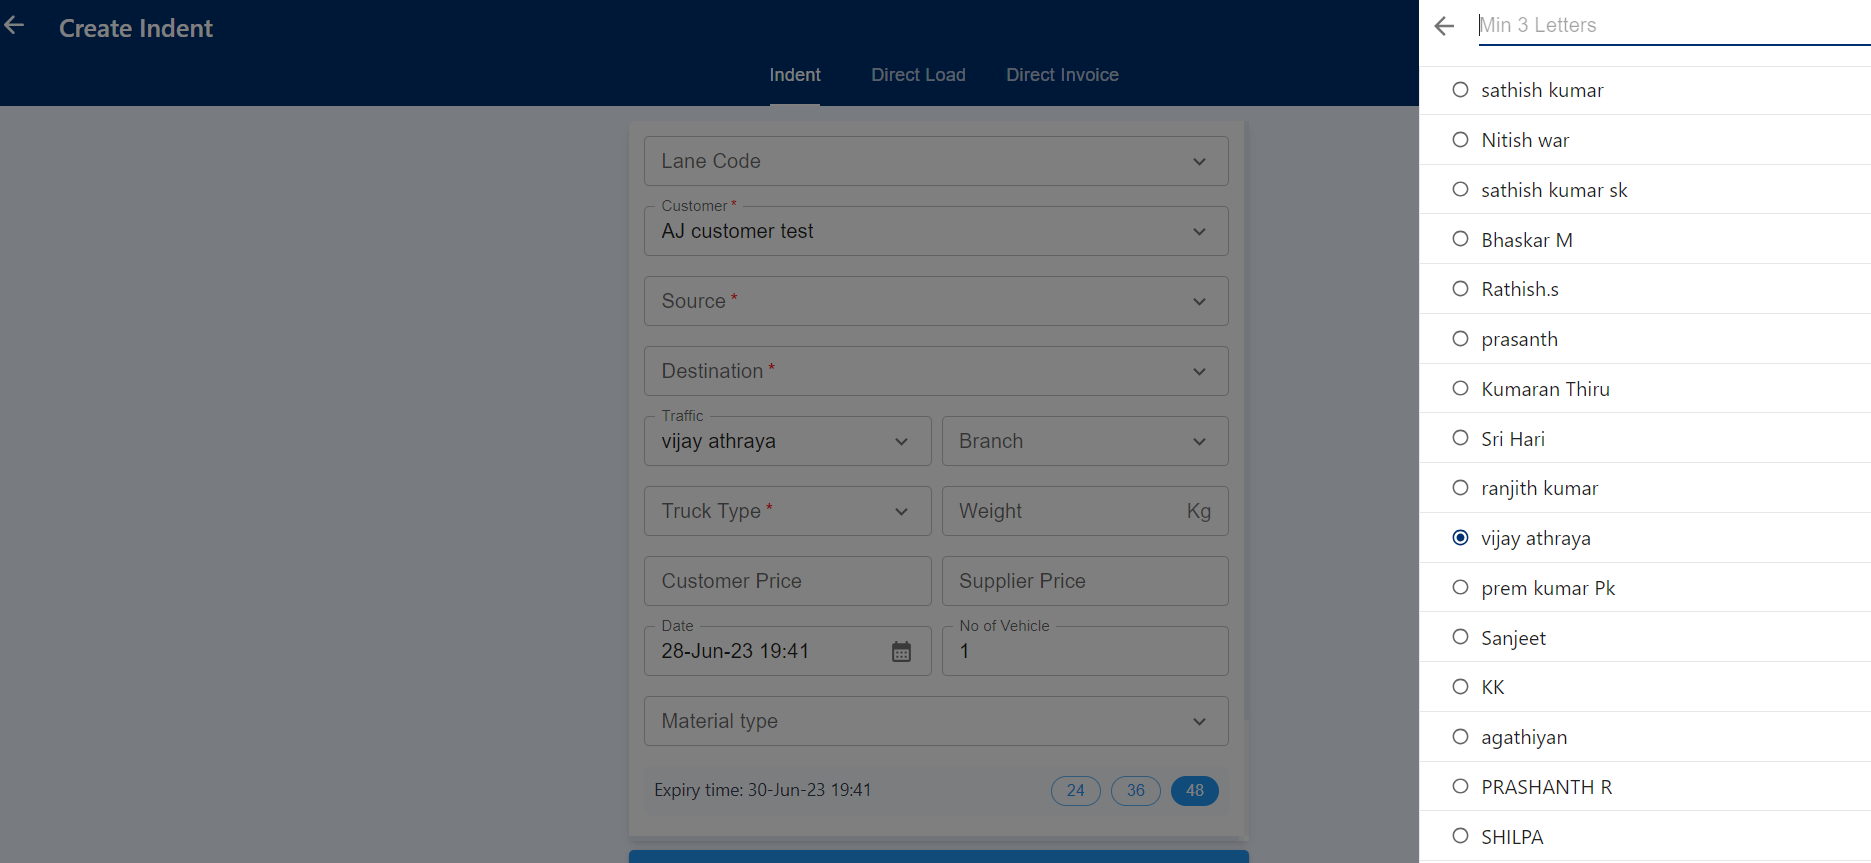
+**Traffic**
+
+While click on this field, displays traffic role employee list where user can allow to allocate traffic employee for upcoming trips related to this indent. After customer selected traffic employee will auto filled based on customer branch. User can able to change traffic employee based on their needs by selecting any of them in displaying list.
+
+
+
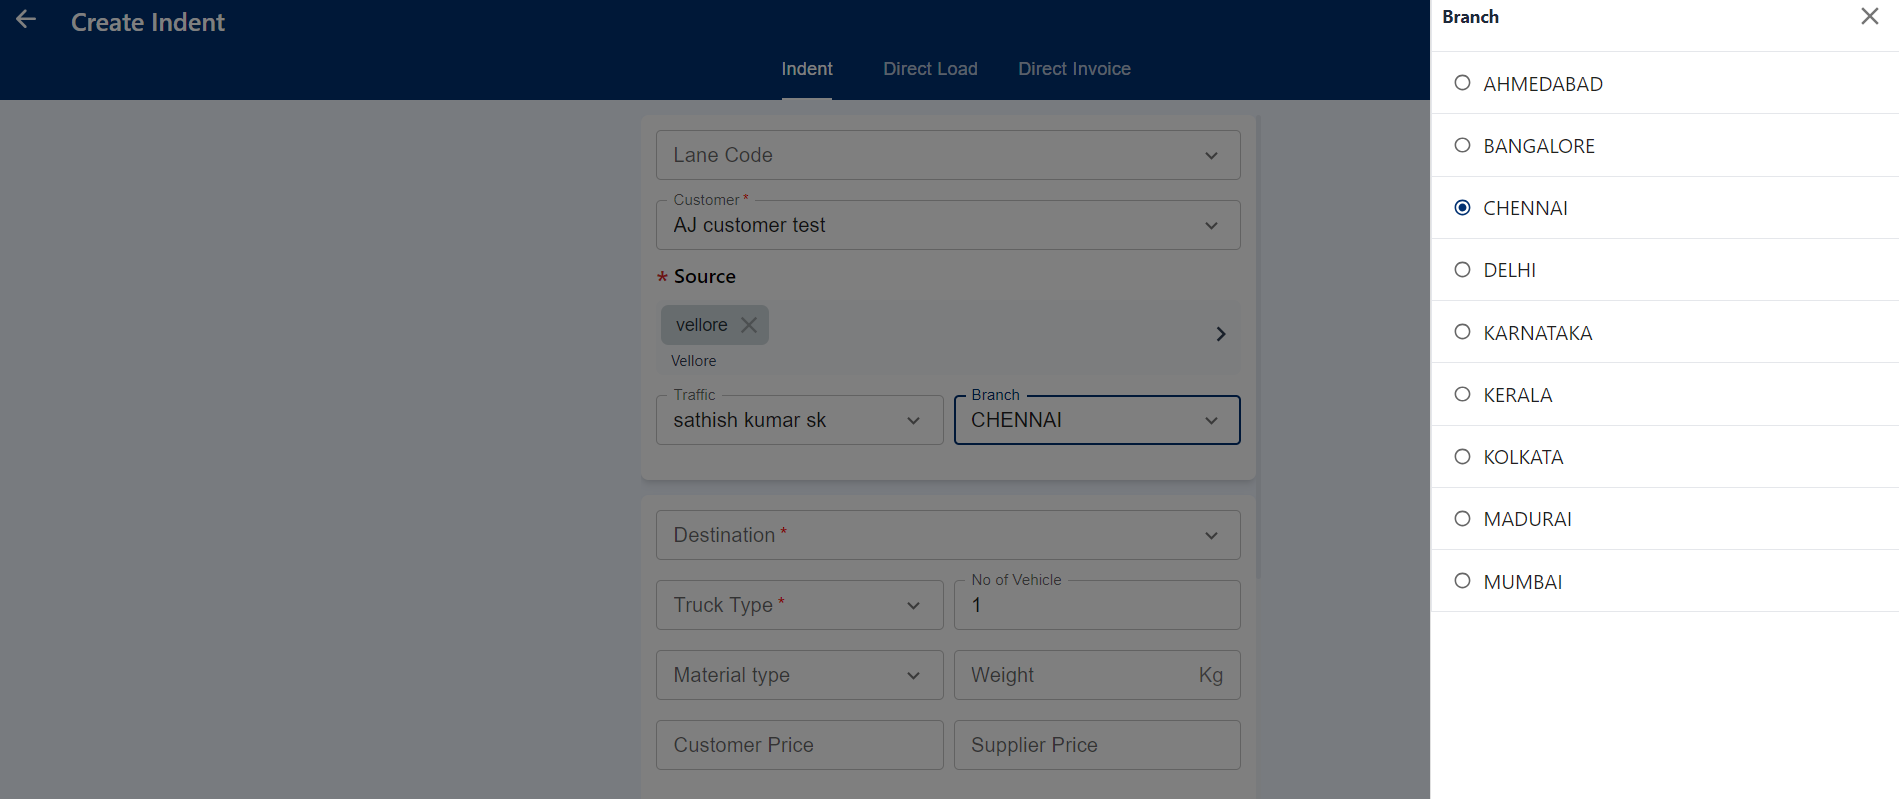
+**Branch**
+
+In this field, users have the option to select their company branch, ensuring that employees from other branches cannot access data from different branches. By default, the field displays the source branch name configured in the organization tab by the admin. Once a branch is selected, any updates or modifications related to this indent will only be visible to employees assigned to the respective branch. This restriction helps maintain data confidentiality and ensures that information is only accessible to the relevant branch employees.
+
+
+
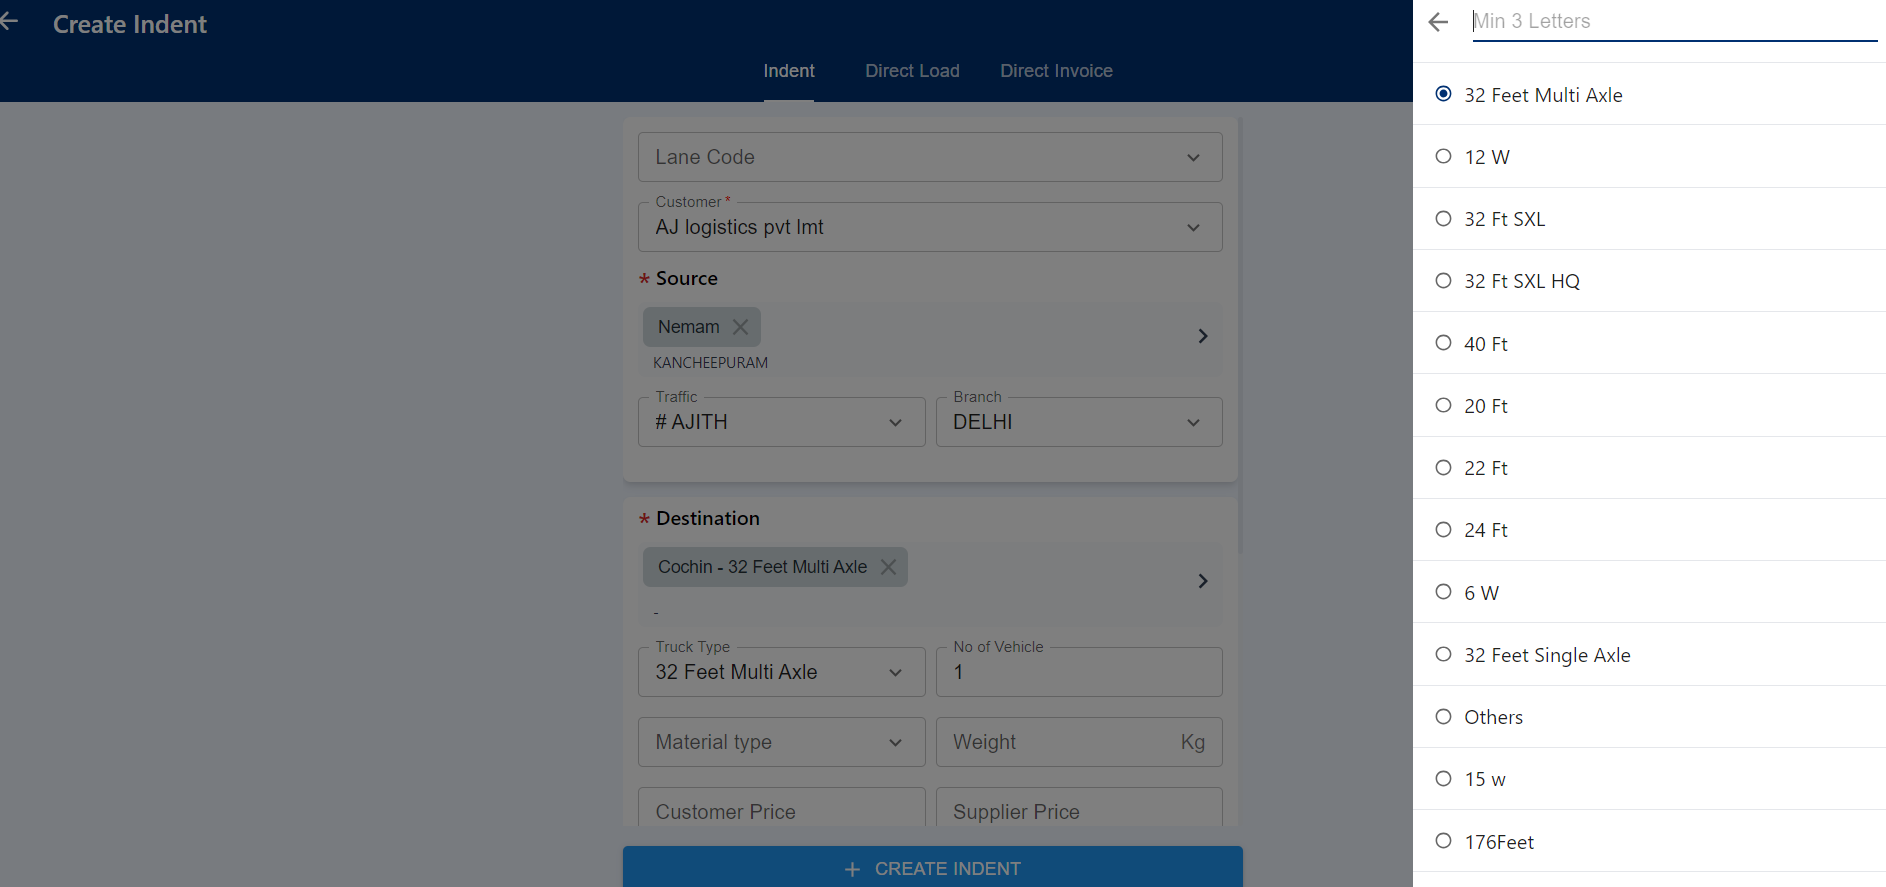
+**Truck Type**
+
+Within this field, users can select the truck type for creating the indent. The available truck types are displayed on the right side for user selection. If the indent is created from a lane, this field will be automatically filled with the truck type entered when the lane was created. However, even if the truck type is auto-filled from the lane, users still have the flexibility to change the truck type if needed.
+
+
+
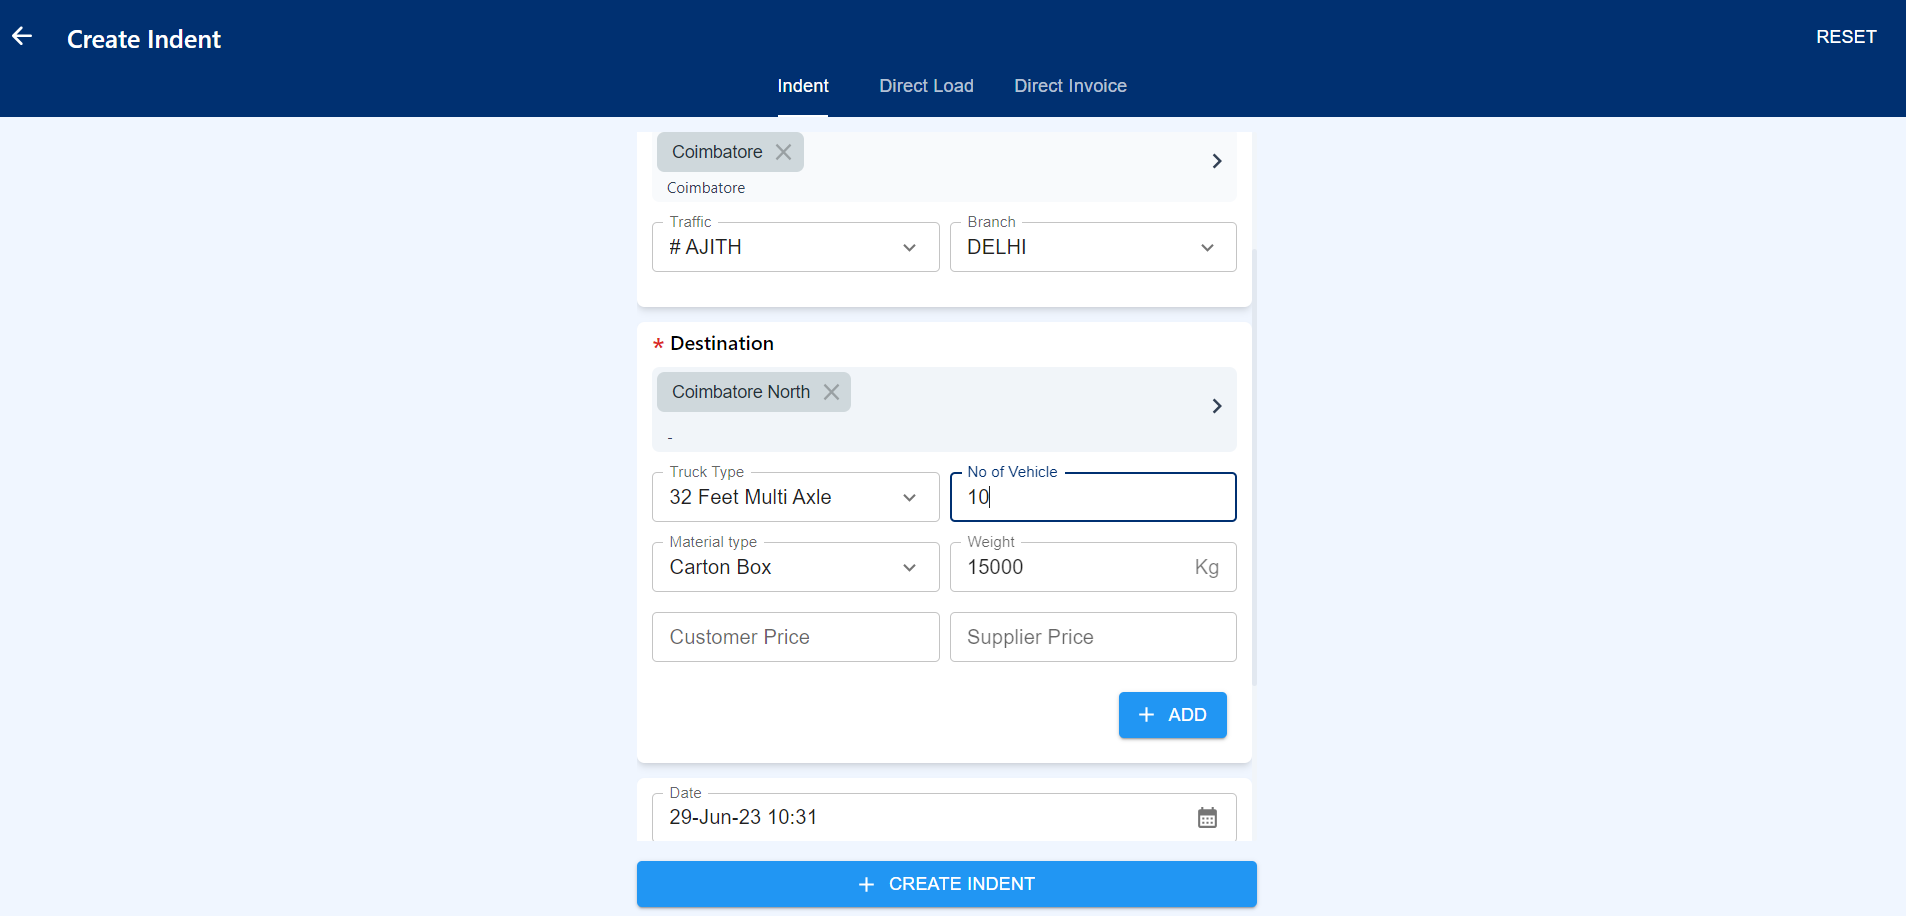
+**No of Vehicle**
+
+In this field, users can enter the number of trucks required for the indent, which helps in avoiding multiple indents for the same source and destination. Users can input any count based on the customer's request or requirements. This allows for precise allocation of resources and helps streamline the transportation process.
+
+
+
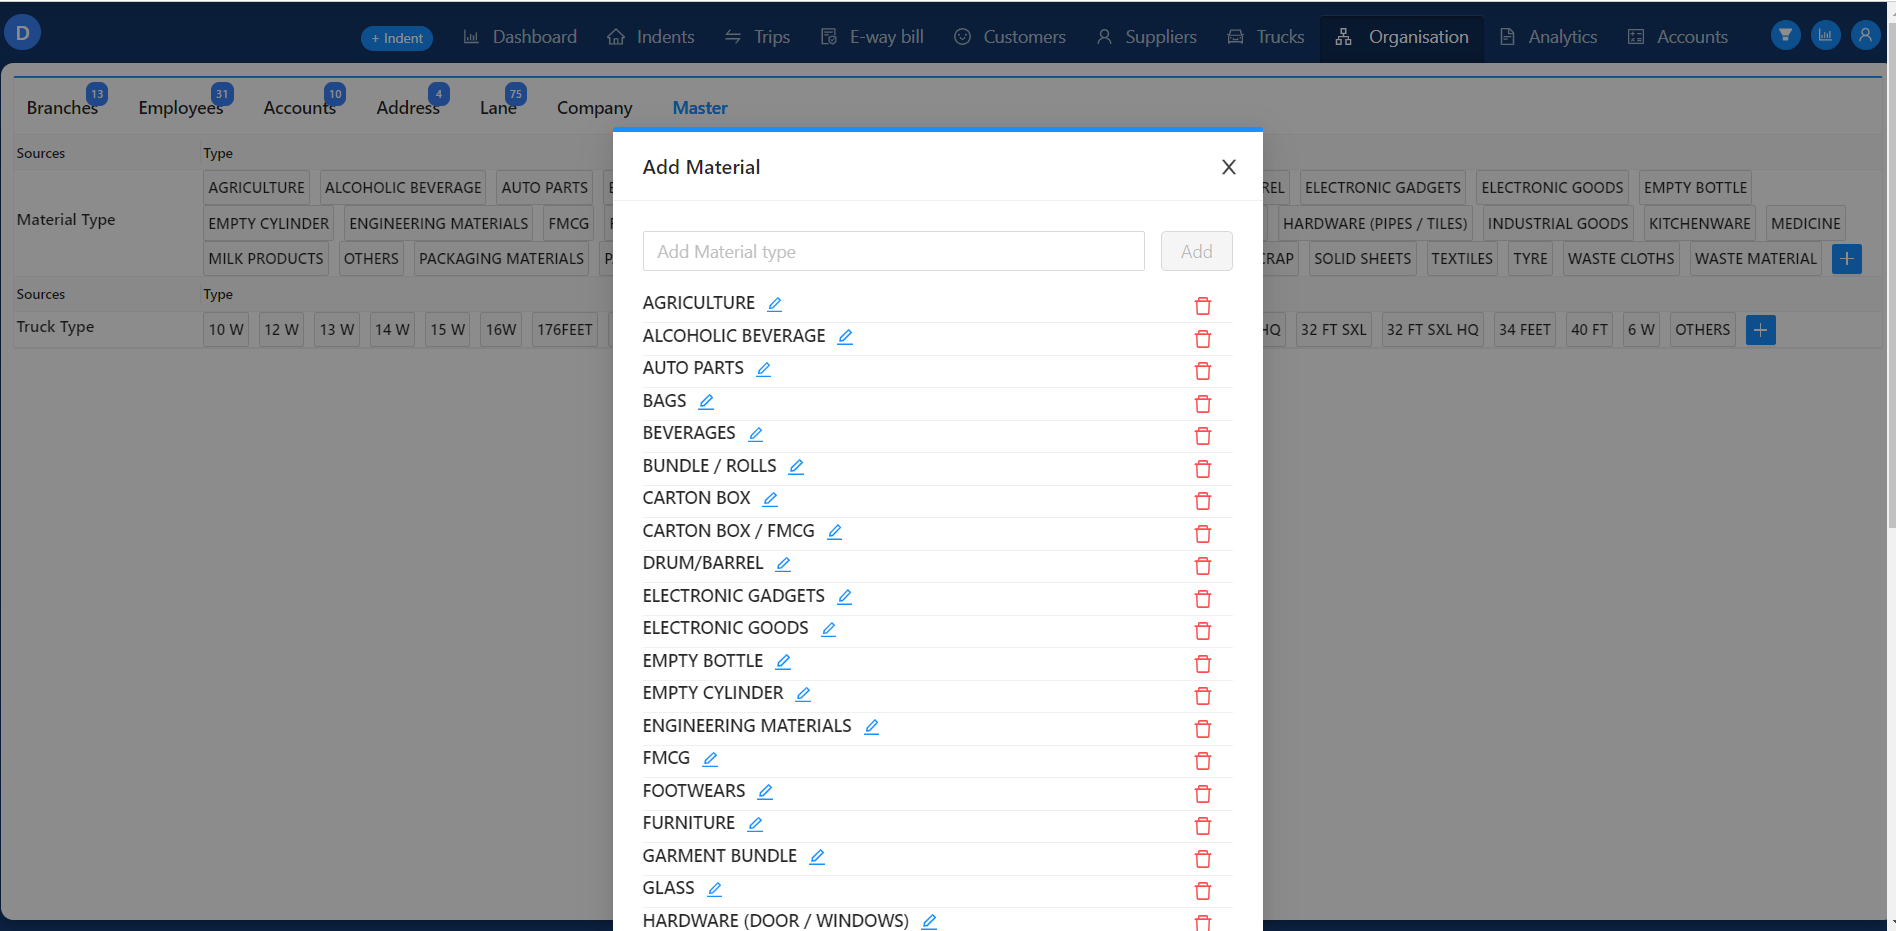
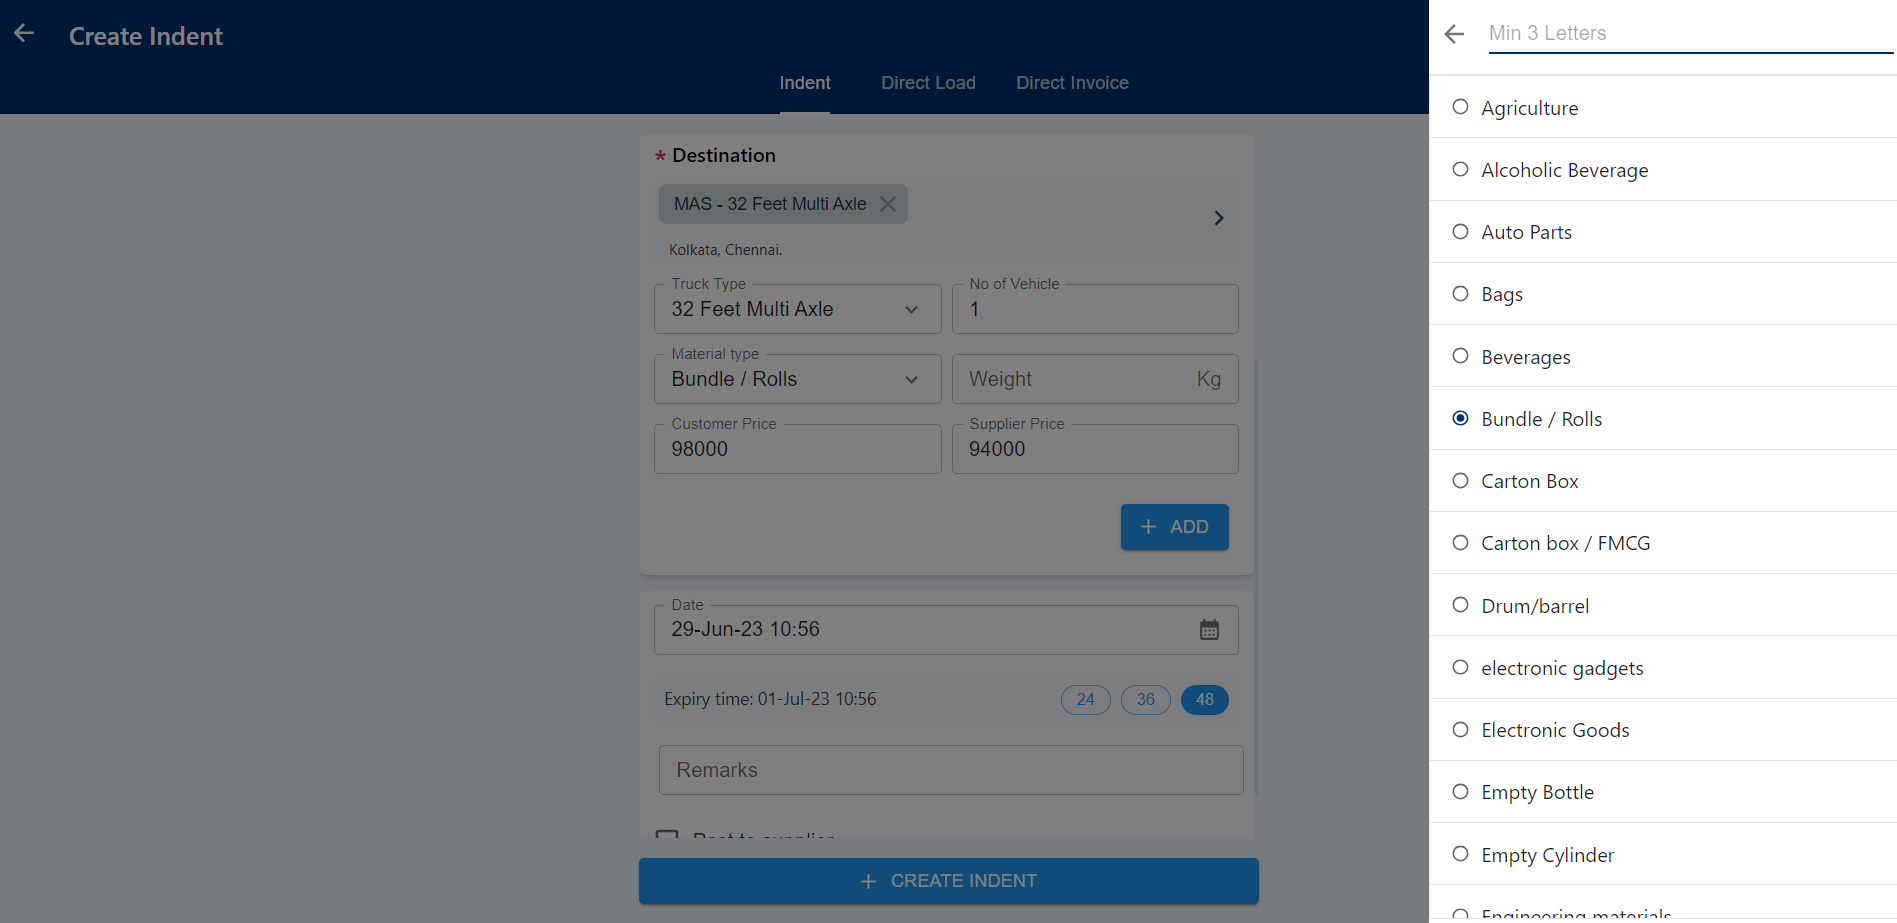
+**Material Type**
+
+In this field, users have the option to add a material type for creating the indent by clicking on the material type field. Upon clicking, a list of material types will be displayed on the right side, which are configured by the admin in the organization tab > Master > Material Type. Users can select any desired material type from the displayed list. Alternatively, users can search for specific material types by entering their names in the search field. This feature allows for accurate categorization of indents based on the specific material types involved.
+
+
+
+
+
+**Weight**
+
+Here user can able to enter weightage of the trip in KG(Kilo Grams).
+
+
+
+**Customer Price and Supplier Price**
+
+In this system, the user can enter the prices for both the customer and the supplier by manually inputting the respective amounts. It's important to note that the supplier price is not validated against the customer price. This means that the user has the ability to update the supplier amount to be higher than the customer price. This type of payment, where the supplier price exceeds the customer price, is useful for adjusting any pending balances from previous trips.
+
+
+
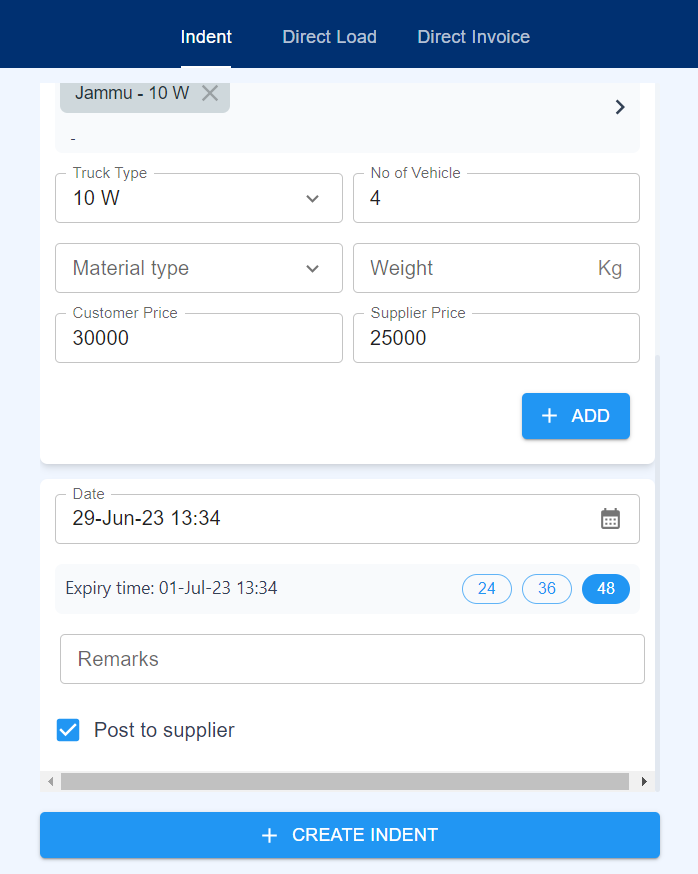
+After updating all the data, you can click on the "Add" button. However, please note that this button will remain disabled until all mandatory data is updated. Once all the required information is filled, the "Add" button will become active. The updated destination will then be moved down in the list, along with a corresponding "Delete" button. By using the delete button, the user can remove a specific destination from the list. Once a destination is added, the user has the ability to add multiple destinations if it is configured in the customer lane.
+
+**Expiry time**
+
+In the system, there is a feature that displays the expiration time for an indent. This calculation is based on the time the indent was created. Three options for expiration are provided: 24 hours, 36 hours, and 48 hours. By default, the system selects 48 hours as the expiration time. However, the user has the ability to change the expiration hours based on the required arrival time of the truck.
+
+When the expiration hours are modified, the corresponding dates and times will also be adjusted accordingly. This expiration time, referred to as "Tat(hrs.)," is displayed in the indent tab after the indent is created. It helps track the remaining time until the indent expires.
+
+
+
+**Remarks**
+
+Here user can add comments or their opinion for their creating indents.
+
+
+
+**Post to supplier**
+
+This field includes a checkbox that is initially unchecked. By selecting this checkbox, the user grants permission for the supplier to view the created indents. This allows the supplier to express their interest in a particular indent. Once the supplier shows interest in an indent, the admin, BM (Business Manager), or traffic role employees can review and confirm the trip with the interested supplier.
+
+By utilizing this feature, users can easily and quickly identify suppliers who have expressed interest in a specific indent, eliminating the need for additional phone calls or communication methods.
+
+
+
+After updating all the necessary data, the user can create an indent by clicking the "Create Indent" button located at the bottom of the page. Upon clicking this button, an indent will be generated based on the user's provided data, and it will be displayed in the indent tab.
+
+It is important to note that if any mandatory fields have not been updated, the indent creation process will not proceed, and an error message will be shown to the user. This ensures that all required information is entered before creating the indent.