Revision: 82597c2d0f
Lanes 003
@@ -1 +1,70 @@
-No Content
+In the customer detail page, users have the option to create customer lanes for customers who frequently take trips from a specific source to a particular destination. A customer lane is a predefined route that is commonly used by a customer for their trips. By creating customer lanes, users can save time and effort when entering trip details, as they can select the preconfigured lane instead of manually entering the source and destination each time.
+
+
+
+This feature is especially useful for customers who have regular transportation needs between fixed locations, as it simplifies the trip creation process and enhances overall efficiency in managing customer trips.
+
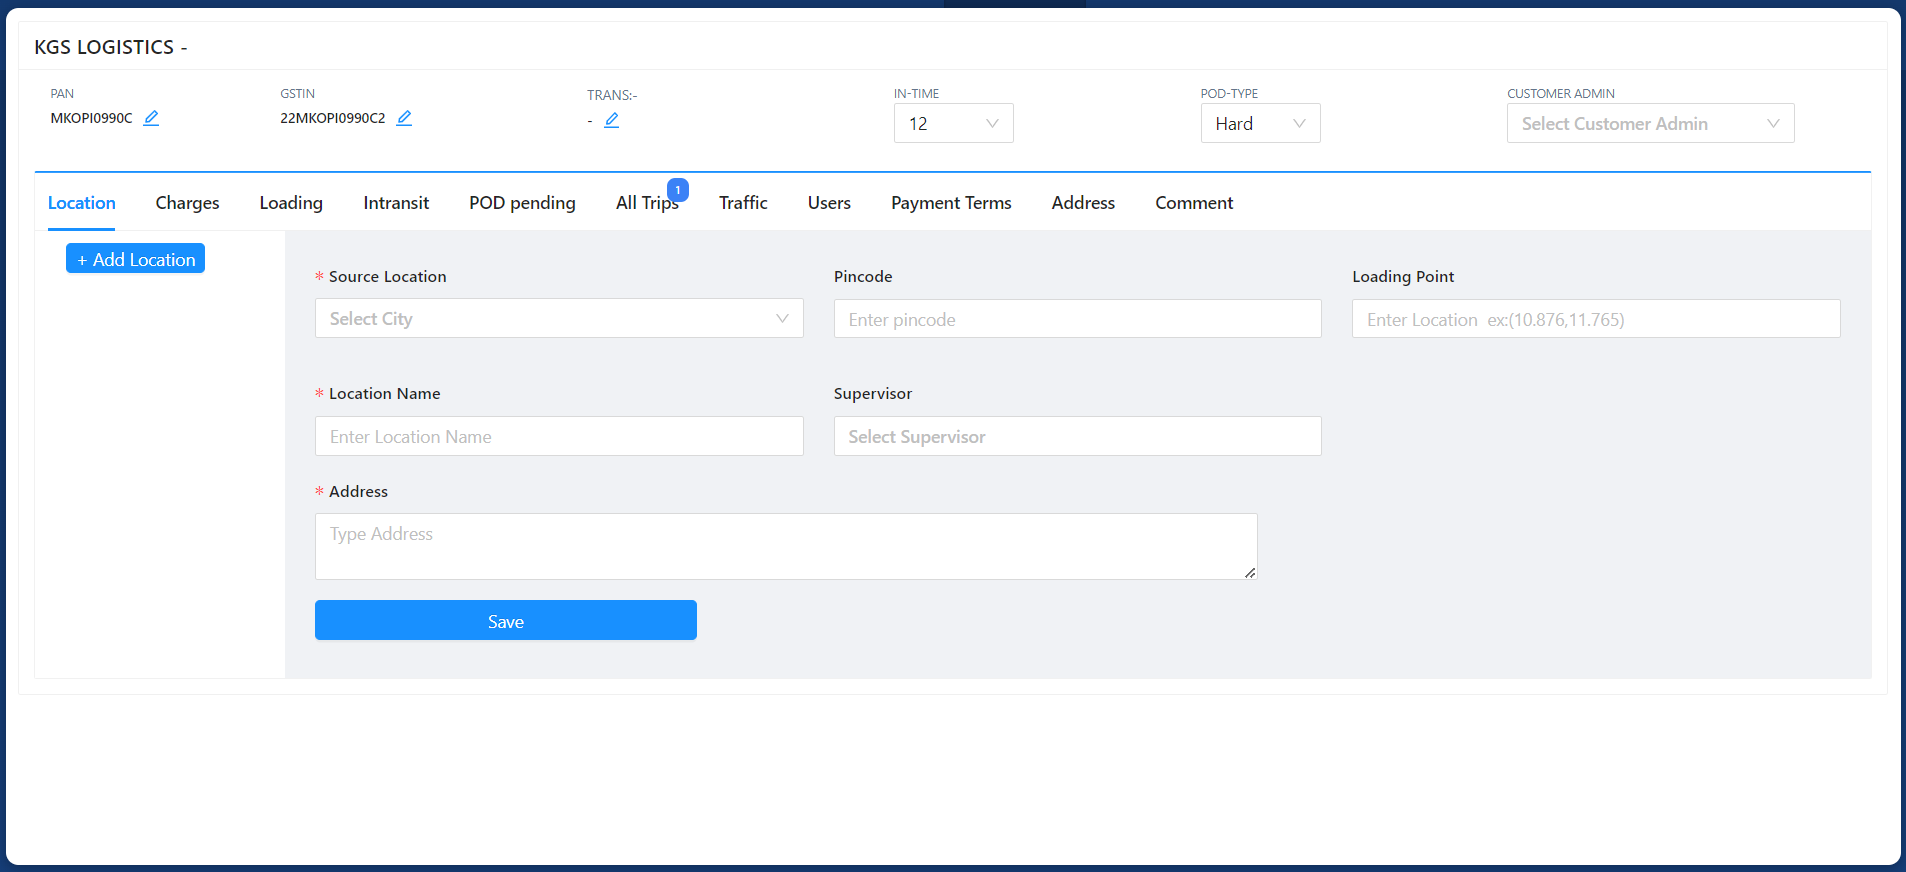
+To create Customer Lanes, users should navigate to the customer detail page. Within the customer detail page, there will be a section titled "Location," which will display an "Add Location" button. By default, the "Add Location" button will be selected and ready for use.
+
+In the "Add Location" module, the following field titles will be displayed for each field:
+
+1. **Source Location** : The "Source Location" field enables users to enter the name of the source city for the Customer Lane. To facilitate this process, users can search for the source city name by typing in the search bar. As they start typing, the system will display multiple city names that match the search query. From the search results, users can easily select the appropriate source city name from the list. This feature helps ensure accurate and standardized entry of source city names, preventing errors and simplifying the process of creating Customer Lanes with the correct source locations.
+2. **Pincode**: The "Pincode" field allows users to input the Pincode associated with the source location, typically the Pincode of the city or area where the location is situated. This Pincode helps in accurately identifying and specifying the exact geographic location within the city or area, making it easier to manage and navigate the Customer Lanes effectively. When the Pincode is entered, the system will automatically fetch and display the corresponding Source Location in the Location Name field.
+3. **Loading Point :** This field is utilized to enter the loading point information in the form of Google Maps latitude and longitude coordinates (e.g., 13.097392, 80.164982) for the Customer Lane. By providing these specific coordinates, the system can accurately pinpoint the exact loading point location, ensuring precise and efficient trip planning and management.
+4. **Location Name :** This field allows users to provide a custom display name for the specific location within the Customer Lane. This name is used to identify and distinguish the location within the system and can be customized according to the user's preferences or the specific context of the Customer Lane. This feature enables users to organize and manage the locations effectively, making it easier to reference and work with different locations associated with the Customer Lane.
+5. **Supervisor:** This field allows users to assign one or multiple supervisors to the specific location within the Customer Lane. When users click on this field, it displays a list of employee names with the supervisor role. Users can easily select one or more supervisors from the list to assign them to the particular lane. This feature enables efficient assignment of supervisors to different locations within the Customer Lane, ensuring effective oversight and management of the trips associated with those locations.
+6. **Address:** The address field allows users to input the detailed address of the location within the Customer Lane.
+
+
+
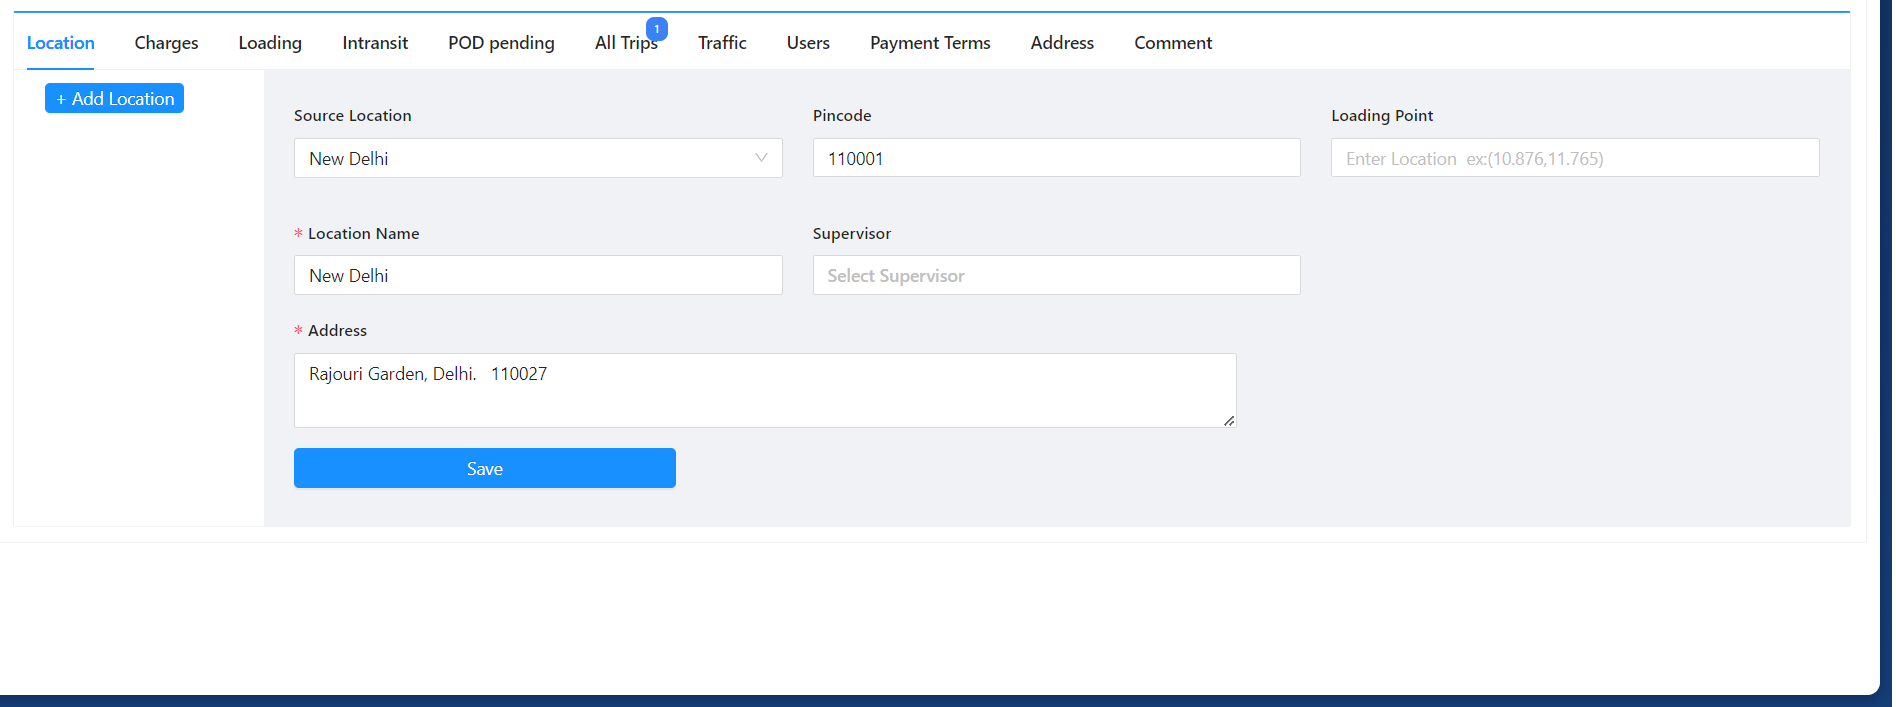
+After updating all the mandatory data, the user can create a source lane by clicking the "Save" button. Once the "Save" button is clicked, the user will be directed to the destination detail screen, which will have fields similar to the Source.
+
+The following list of names will be displayed as titles for the fields on the destination detail screen:
+
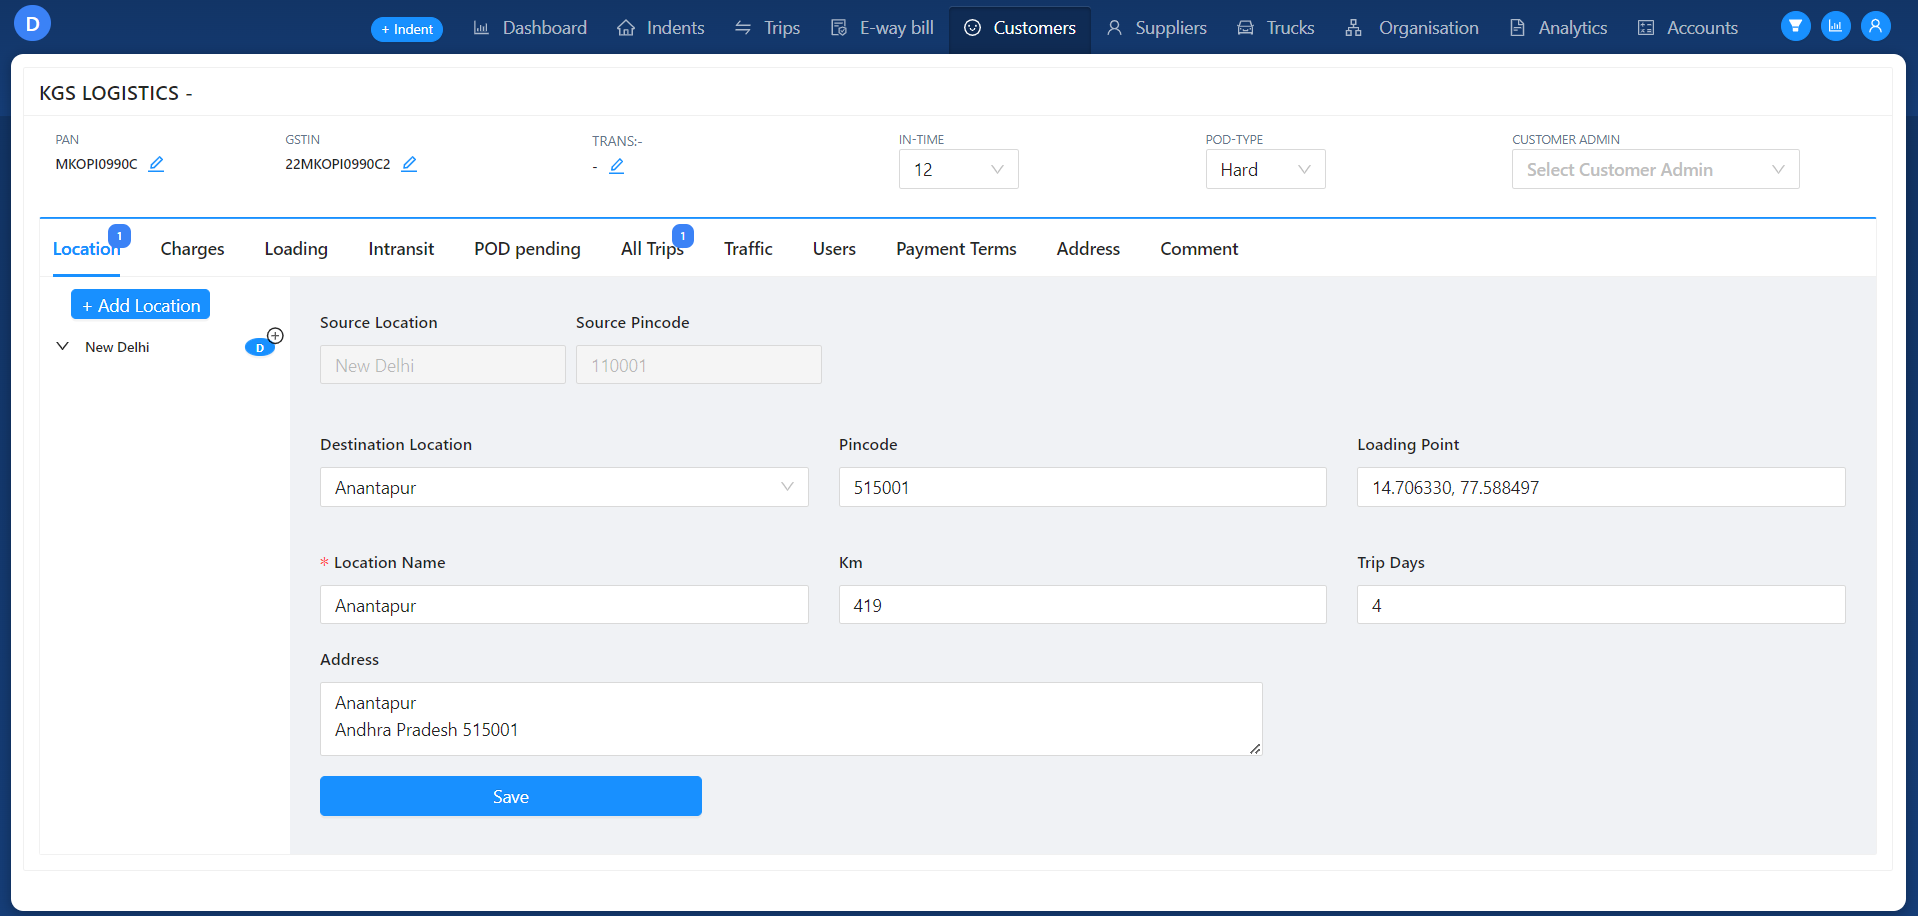
+1. **Destination Location:** This field allows users to enter the name of the destination city for the lane.
+2. **Pincode:** Users can input the Pincode associated with the destination location.
+3. **Loading Point:** This field is used to enter the loading point information for the destination.
+4. **Location Name:** Here, users can specify the display name of the location within the destination lane.
+5. **Km(Kilometer) :** Here users can manually input the distance in kilometers between the source and destination locations. However, by default, the system will automatically calculate and update the distance between the source and destination, saving users the effort of manual input. This automated feature ensures accuracy and convenience in specifying the distance for the Customer Lane.
+6. **Trip Days:** This field allows users to enter the number of days typically required for a trip between the source and destination.
+7. **Address:** The address field allows users to input the detailed address of the location within the destination lane.
+
+
+
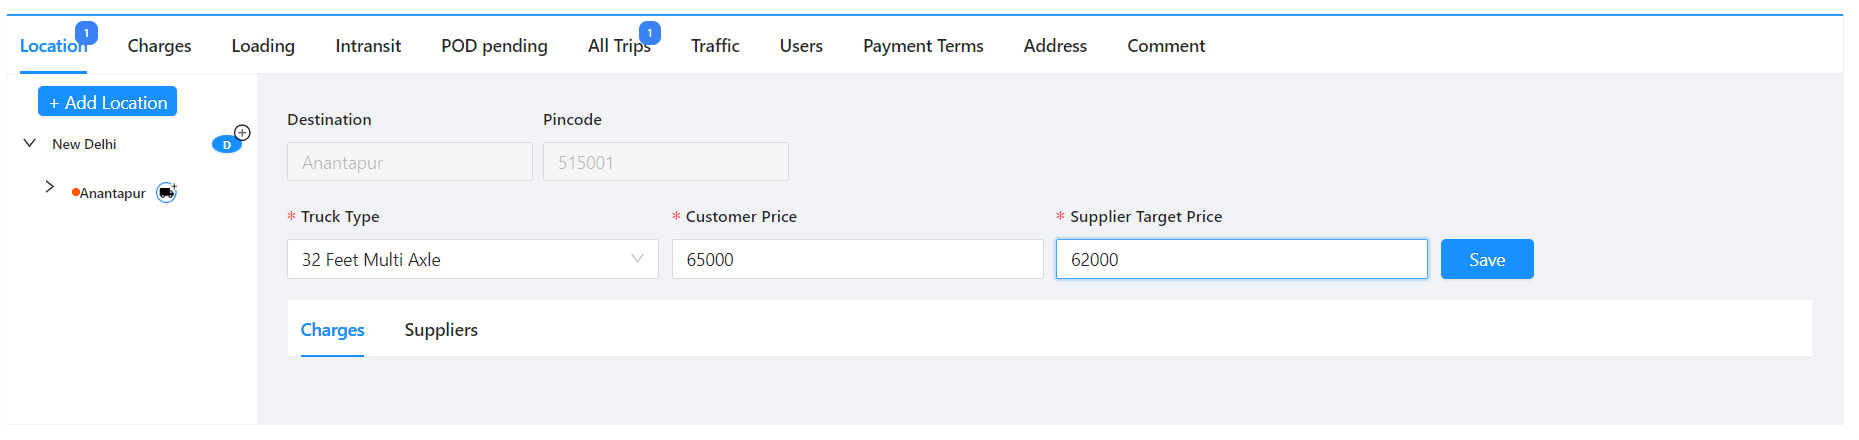
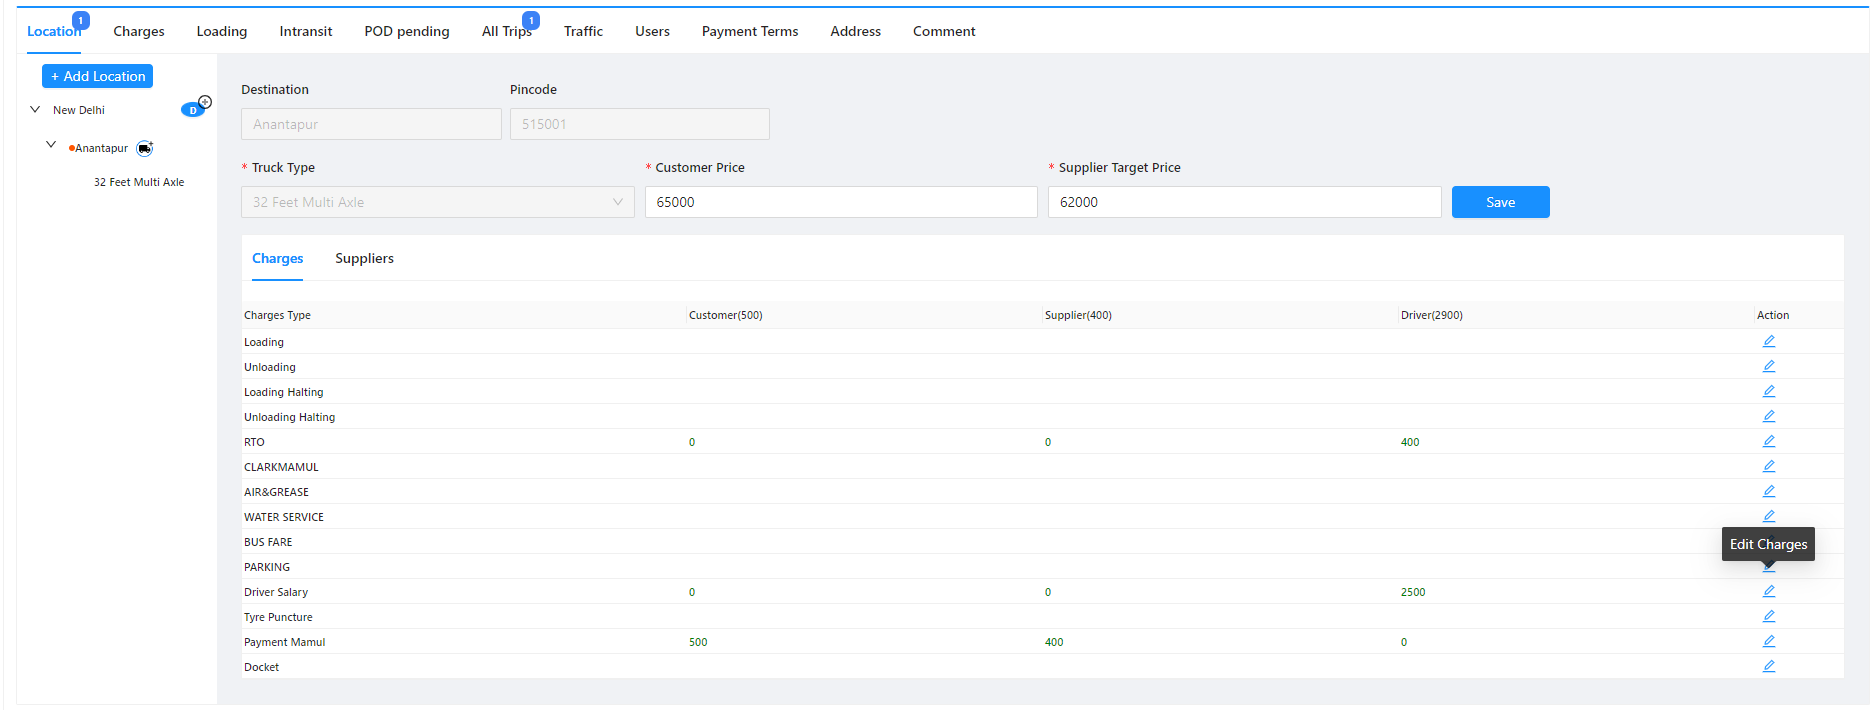
+After updating all the mandatory data, the user can proceed to create a destination lane by clicking the "Save" button. Upon clicking the "Save" button, the user will be redirected to a screen where they can input information related to the truck type, Customer Price, and Supplier Target Price for the specific lane.
+
+
+
+This screen allows the user to specify the appropriate truck type for the lane, along with the respective Customer Price and Supplier Target Price. By providing these details, the user can complete the setup of the destination lane, ensuring accurate pricing and trip planning for the Customer Lane.
+
+After clicking the "Save" button, the screen will display a list of charges for the Customer, Supplier, and Driver roles, each with an edit icon in the Action column. Users can easily access and modify the charges specific to their respective roles by clicking the edit icon.
+
+This feature empowers users to update charges as needed, ensuring accurate pricing and efficient management of charges for different roles involved in the Customer Lane. The edit functionality enhances user control and flexibility, facilitating smooth and effective management of charges within the system.
+
+
+
+After updating the destination lane details, the system will display relevant information such as the city name, KM (distance), Trip days (duration), Address, Location Name, and Action.
+
+This display allows users to easily review and verify the entered details, ensuring accuracy and completeness of the destination lane setup. The "Action" column may include options for further actions, such as editing or managing the destination lane details.
+
+
+
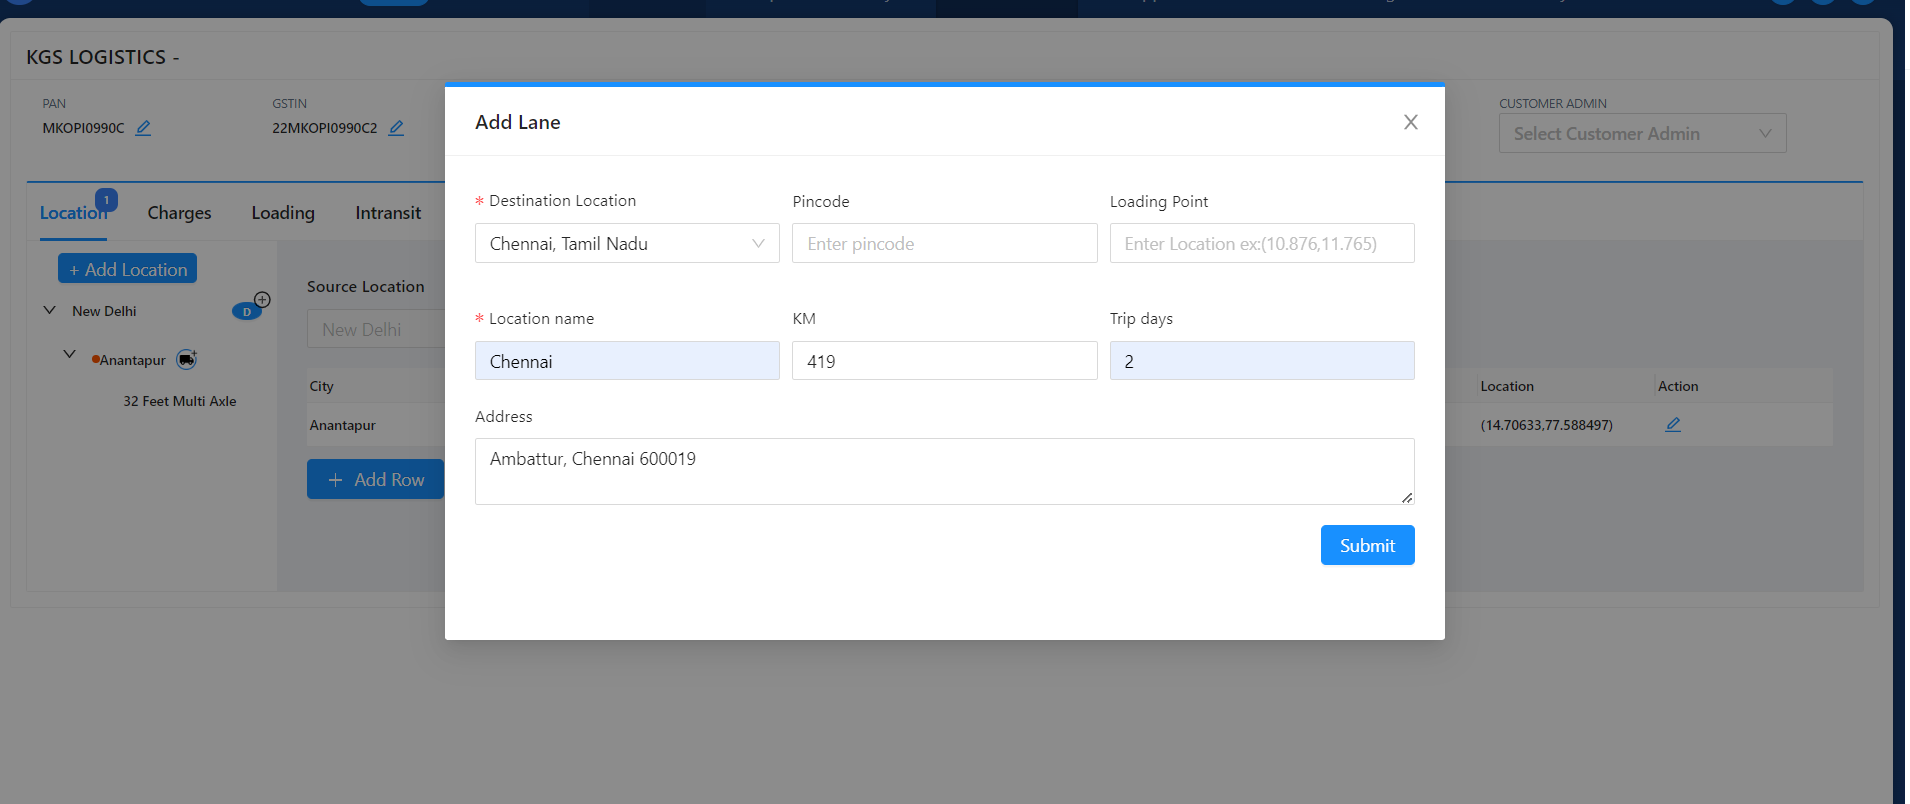
+Users are allowed to add multiple destination lanes for a single source lane by clicking the "Add Row" button displayed under the destination lane details section. When they click on the "Add Row" button, the "Add Lane" module will appear, providing users with the option to add data for a new destination lane similar to existing destinations.
+
+Within the "Add Lane" module, users can input all the required data for the new destination lane, including city name, KM (distance), Trip days (duration), Address, and Location Name, just as they did for the existing destination lanes.
+
+This functionality enables users to efficiently create and manage multiple destination lanes associated with a single source lane, streamlining the process of setting up comprehensive trip routes and ensuring effective trip planning and assignment within the system.
+
+
+
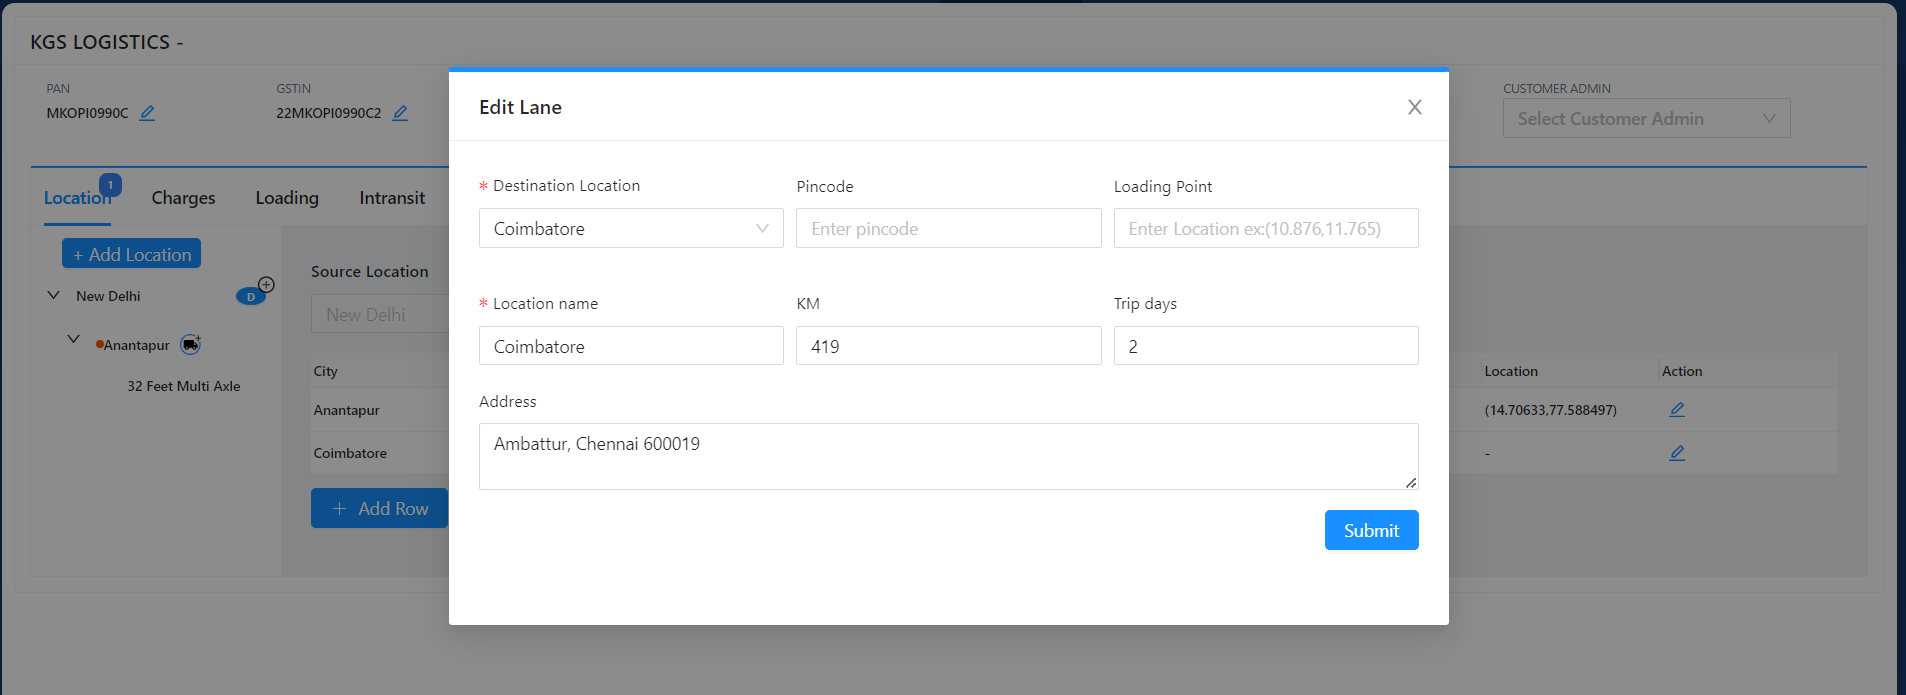
+In the Action column of the destination lane details, there will be an edit icon displayed for each destination lane. By clicking on this edit icon, users can access the "Edit Lane" module, which allows them to modify the data in the destination lane. Within the "Edit Lane" module, users can make changes to the city name, KM (distance), Trip days (duration), Address, and Location Name of the destination lane. This feature provides users with the flexibility to update and customize the destination lane information as needed.
+
+By utilizing the edit icon and the "Edit Lane" module, users can easily manage and modify destination lane data, ensuring accurate and up-to-date information for effective trip planning and management within the system.
+
+
+
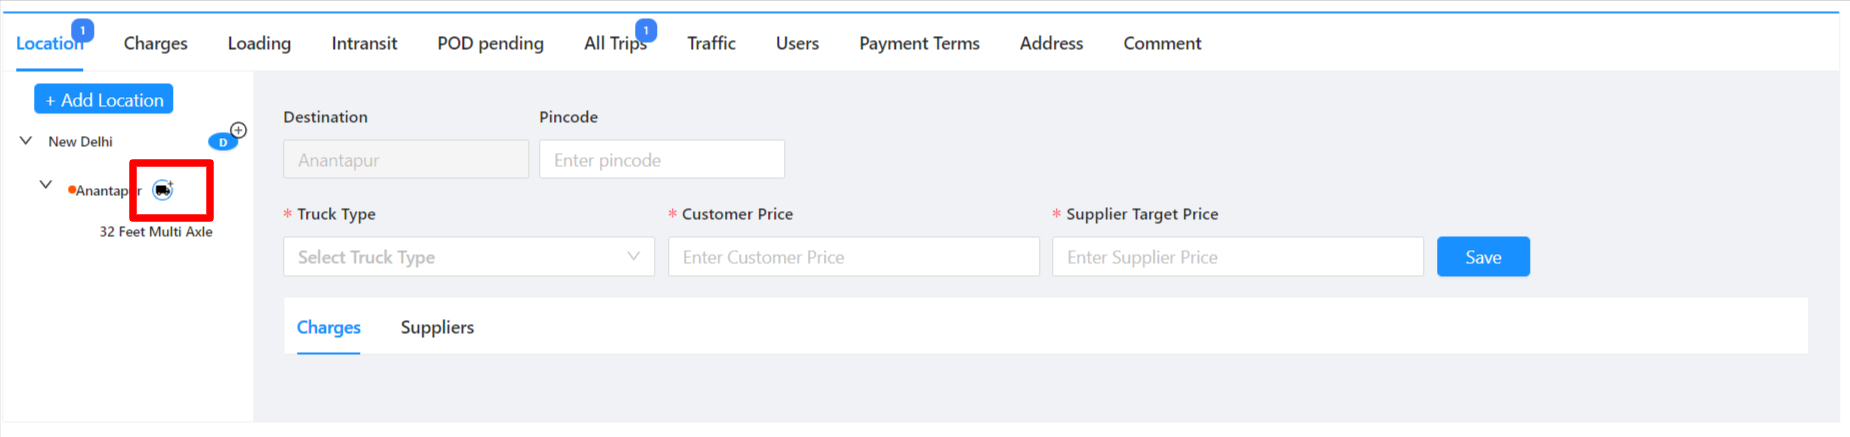
+After updating the destination lane details, users can add multiple truck types for the created lane by clicking the "Add Truck" button displayed near the destination name. Clicking the "Add Truck" button will open the "Add Truck Type" module, where users can input the truck type, Customer Price, and Supplier Target Price, similar to what they added before. Once the data is entered, users can save the information for the new truck type. Users can follow the same process for adding multiple truck types, allowing them to efficiently specify different pricing and target details for various truck types associated with the created lane.
+
+
+
+This feature streamlines the process of managing multiple truck types for the same destination lane, facilitating effective trip planning and assignment based on the selected truck type and associated pricing.