Revision: ecb527c49d
Edited Address
@@ -1 +1,37 @@
-No Content
+In this tab, users have the capability to add multiple branch addresses by selecting the "Add Address" button located at the top right of the page. Users with Admin and BM (Branch Manager) roles have the authority to add or edit addresses in this section.
+
+The added addresses will be displayed and available for selection when invoicing a trip. During the invoicing process, users can modify or add new addresses as needed. This flexibility allows for accurate and up-to-date address information to be associated with the invoiced trips, ensuring that the correct addresses are reflected in the generated invoices.
+
+
+
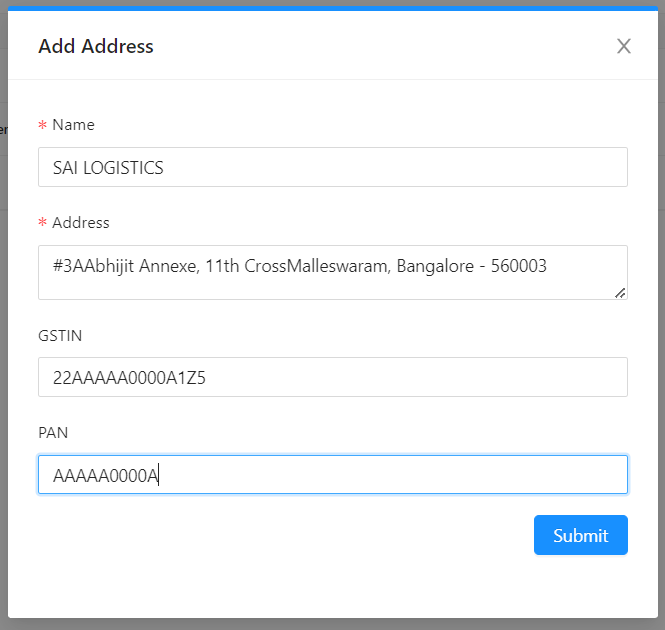
+When the "**Add Address**" button is clicked, an "**Add Address**" module will appear with the following fields:
+
+1. **Name**: This field is mandatory and allows the user to enter the company name or branch address name associated with the address being added.
+2. **Address**: This field is mandatory and allows the user to enter the complete address of the company or branch.
+3. **GSTIN**: In this field, the user can update the GST (Goods and Services Tax) number associated with the company or the specific branch address.
+4. **PAN**: This field allows the user to update the PAN (Permanent Account Number) related to the company or the specific branch address.
+
+After updating all the required data in the respective fields, the user can create the address by clicking the "Submit" button. This will add the address to the system and make it available for selection and use during trip invoicing or other relevant processes.
+
+
+
+After the user clicks the "Submit" button, the address will be successfully created and displayed in the Address tab, as shown in the first image. In the list of displayed addresses, users have the ability to select any one address as the primary address.
+
+To designate an address as the primary address, the user can check the radio button located near the name column for that specific address. This action indicates that the selected address will serve as the primary address among the list of available addresses.
+
+By selecting a primary address, the chosen address will be displayed as the default address among all the company addresses. This means that when viewing the company details or selecting addresses for various purposes within the system, the selected primary address will be shown by default.
+
+Having a primary address set helps in providing a clear reference point and ensures that the chosen address is readily visible and easily accessible whenever company addresses are displayed or used in different modules or processes.
+
+
+
+**Note** : Users are allowed to change the primary address of the company by following these steps:
+
+1. Start by unselecting the currently selected primary address. This can be done by deselecting the radio button associated with the address in the Address tab.
+2. After unselecting the current primary address, select the desired address from the available options by checking the radio button next to that address.
+3. By selecting the new address as the primary address, it will be updated and displayed as the default address for the company.
+
+This flexibility allows users to easily switch the primary address of the company by deselecting the current selection and selecting the desired address from the list.
+
+
+